Thursday, December 27, 2012

Cardinal Thanks

I am sure that like me, now that Christmas is over, you need thank you cards.  

I never got around to making a Christmas card with this Cardinal with Holly  that I cut out with a Creative Cutz die from Creative Cuts and More so I thought I would use it for a Christmas Thank you card.

I used a little Pebbles chalk on the bird and popped his wing up with a pop dot.
I used Jellie Dots from the Rubber Cafe for the Holly and his eye.  The sentiment is from The Rubber Cafe too.

I hope the person I send this card too loves it as much as I do.


thanks for stopping by!
Kristine

Saturday, December 22, 2012

merry & bright

hi!  i honestly can't believe that it is the weekend before christmas! i have a holiday card to share with you today, as my last post for 2012. i used the elegant reindeer cottage cutz die. then i added a little scrap of white paper to add the effect of snow. wanted a little color so i did a splash of washi tape on the edge of the inside of the card.  stamped some snowflakes and the inside sentiment that says "may your season be merry and bright" with stamps form unity stamp co.


have a good weekend and hope you can spend some time getting crafty!
and have a very merry holiday season!
angie

Thursday, December 20, 2012

What a Cracker!

Today I made some cute little cracker Candy Boxes to match this cute image on this card.

Cracker Candy Boxes by Creative Cuts and More are a fun way to give a little gift.
You can fill them up with candy or money or whatever else you can fit in them.
The Candy Boxes come die cut with the folding lines all pre-scored.
I covered these with patterned paper and then put them together with Killer white Tacky Tape. 
I tied matching ribbon around the ends.

This adorable image is from Strawberry Kisses-"What a Cracker" from Crafter's Companion.


Thanks for stopping by Today!

Kristine

Thursday, December 13, 2012

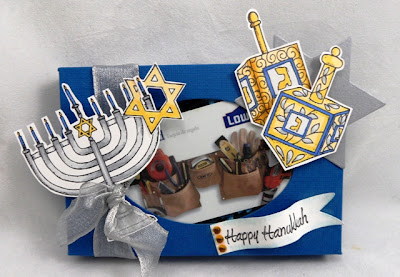
Hanukkah Gift Card Box

Today I have a fun box to share with you that is the perfect size for giving a gift card.

I decorated mine for Hanukkah but you could decorate this box for any occasion!


I started with an Oval Window Box with Acetate Rectangle cut from Wildberry Pie cardstock.

I put the box together with Killer White Tacky Tape


I decorated the box with images that I stamped, colored and cut out.  
The stamps are from the "Celebrating the Festival of Lights" set from The Rubber Cafe.


I added a little shredded paper fill to the box to help hold the gift card in place.
And tied the ribbon around it to hold the box shut.  It slides right off.


Stamps:
"Celebrating the Festival of Lights" set from The Rubber Cafe
Paper:
Oval Window Box with Acetate Rectangle  
Mohawk smooth white cardstock 
Ink:
Memento Tuxedo Black Die Ink
Spectrum Noir markers 
Other: 
Jellie Dots from The Rubber Cafe
Spellbinders label Die 
Killer White Tacky Tape 
Celebrate It Ribbon 

Thanks for stopping by!

Kristine 

Saturday, December 8, 2012

home

hi there!  i have a simple card to share today.  it started out as a christmas card in my mind, but ended up being a "happy new home" kind of card!  i started with four pane a2 window card, then stamped a little living room scene in the background.  added the sentiment and some washi tape and it was complete!  all stamps are by unity.


have a good weekend and hope you can spend some time getting crafty!
angie

Thursday, December 6, 2012

Candy Sleigh

Welcome to the Die Cut Divas Blog!
Today I have a fun Die Cut Sleigh to share with you!

 I started with a die cut 3D Sleigh from Creative Cuts and More cut out of Bazzill Date Swirl cardstock.  I stamped the entire sleigh with Poinsettia Background using VersaMark ink and then I heat embossed with Detail Silver Embossing Powder.
I covered the "blades" with VersaMark ink and embossed them with silver EP too.

The sleigh was put together with killer white Tacky Tape.

I colored Tree Trim Kiddos with Spectrum Noir Markers and then fussy cut the Kiddos out and adhered them to the sleigh.

  I adhered Shaved Ice fragments by Stampendous to the bottom of the sleight to create "snow".

Then I filled it up with candies.  This would look great on your table or would make a fun gift!

  
I hope you enjoyed my project today!

Have a great rest of your day!  

Kristine 

Tuesday, December 4, 2012

Candy Cane Peek-A-View Box

I made this for this weeks Cornish Heritage Farms Challenge to make a Christmas Box or Bag and thought I'd post it over here for our followers too!

Here is the box I made:


I started with a Peek a View Die Cut box from Creative Cuts and More.

I stamped the top and bottom portions with Large Dots Backgrounder from CHF.
Then I punched a strip of red cardstock for the bottom of the box and cut a thin strip of the same cardstock to go around the top portion.


The "sign" stamp is from the Winter Vintage Sign Set from CHF.
I stamped it in red ink and sponged more red ink around the edges.  Then I backed it with a couple of die cut scallop edged panels.

This box would be a great way to display mini candycanes for little visitors to eat or a fun gift for a teacher or friend!


Thanks for stopping by!

Kristine