Friday, July 30, 2010

Have a splendid day!

Hi Everyone, it's Noelle posting today! This A2 card was super easy and really quick to make! I love that! Quick and easy is perfect in my book! The butterfly and flat backed pearls are from my stash. The 'trail' is dots of Stickles. The stamp is from the Dear Lizzy collection by American Crafts! I am going to make sets of these and use the card portfolio so I have gifts ready when I need them!

Thanks for stopping by today! Have a great day!

Thursday, July 29, 2010

4th of July Layout

Hello! Kayla here sharing a layout I recently created! Yes, I know, I am just now getting to my 4th of July pictures from last year! Eek! I didn't have but a couple scraps of 4th of July paper, so I decided to just use red, white and blue cardstock.
I used the Scallop Circle, rhinestones,Filigree rectangle and a page from the Mix & Match album. The sticker and jellishment are from Doodlebug.
I used the rhinestones in place of brads on the sticker and in the center of the jellishment.
I love the little rhinestones in the scalloped edge! The red piece, its a page from the Mix & Match album. I love the fun edges and they make great additions to layout and mats for photos!

Here is another layout using a Mix & Match album page to mat the photos.
Creative Cuts & More has some great products and ideas for babies and weddings. Need some baby inspiration, whether it be a shower, gift or decor? Check out this and this link. Need wedding shower, gift, decor or favor ideas? Check here, here and here.

Tuesday, July 27, 2010

Using Tiny Pictures & Leftovers

Hi all! Kim here FINALLY!
I am still recovering from ankle surgery (thanks for the well wishes!), but I have at least managed to spend some time in my scrap room to create this little treasure for you with some left-over CC&M labels I had on hand...
The Scrap-a-Teeny Girls are all about the mini-album, but I bet you wouldn't have expected one this tiny!!!! The largest label used was the Filigree Square at 3x3 inches!!! These are great sizes to use to showcase quotes, use up your sticker stash or place tiny photos on! Which is just what I did here - I used up some fun summer stickers & embellishments I've had laying around forever with an index sheet from some photos I recently had printed!

(on right, balloon #01)
I just placed various embellishments with the photos I loved best on each label. (On many of the labels, I used Glimmer Mist & Distress Ink to grunge it up a bit beforehand)


(on right, an Antique Label, small - cut in half)

I just love these pix of my 13 yr old son & his crazy hair!
It will be such a hoot to look back on these when he's older!!
It's just a simple little keepsake that my niece & son will enjoy looking through from time to time! It's also a great little gift idea that doesn't take long to put together!! (Think "Stocking Stuffers"!!)

Hope you enjoyed my tiny creation!
Thanks for looking!
Keep scrolling to see what my sister's been up to on the next post!

Shabby Chic Treasure Box

Hi! Becky here to share a little treasure box I made from the Pyramid Flat Top Box in a smooth cream cardstock...

I am a huge fan of the "Shabby Chic" look & wish so desperately that my home was decorated in this wonderful style! So much so, I collect pictures from magazines & websites for future decorating ideas!
(back side)
(one of the sides)
Once I traced the trapazious sides of the box with the papers I wanted to use, I used Killer Red Tacky Tape in 1/4" to adhere the paper onto the box & then again to put the box together.

I then inked the edges of all the sides/papers with ink using Tim Holtz's Ink Applicator (the little thingy that holds felt squares?) to give it a softer aged look. Then I went over two of the sides entirely with the Rock Candy Distress Crackle Paint & only the edges of the opposite 2 sides. After that was dry, I lightly inked again & then decided to add a little of the Antique Brass Distress Crackle Paint to the bottom edges & corners.
(the crackle paint)
 
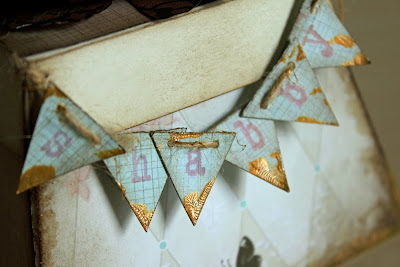
(tiny banner)
I made the little banner from scraps of paper, inked them, stamped "Shabby Dreams," punched tiny holes & threaded the jute through. I then attached it to the lid punching holes again in the corners of the lip of the lid & threading the jute through & tying a knot. At the last minute I added more of the Antique Brass paint to the banner as well.

Finally, I cut a bunch of flowers from the TH die, inked them all, then applied either the Rock Candy paint to an entire flower or the Antique Brass to just the edges of some. Punched holes in the centers, did the same on the lid & attached it all with an antique brass brad from my stash.

Now I have this wonderful little treasure box where I can put little ideas & trinkets - like broken vintage watch faces, a thimble, an old photo, a piece of lace - whatever makes me think of shabby designs! When the time comes, I will open it for my decorating inspiration!!

The other supplies I used were:
Patterned papers by Shabby Green Door from the "On the Wings of a Dream" collection
Tim Holtz products:
  Walnut Stain Distress Ink
  Rock Candy & Antique Brass Distress Crackle Paints
  Tattered Florals die cut
Making Memories magnets letter stamps
ColorBox Pink pastel chalk ink
Jute
A brad

Thanks for looking!!!

Saturday, July 24, 2010

Bird House Ornament


Yes, the title is Bird House Ornament. LOL All I need to do is punch a hole in the top, thread some ribbon through, and tie it in a loop. Wouldn't this look cute hanging on a Christmas tree filled with birdhouses?

This birdhouse is made from a Milk Carton die cut from Creative Cuts and More. The dimensions are listed on the website, but here is a more realistic point of view. Remember the milk cartons you used to have in school? These are the exact same size. They are also the same size as the carton of orange juice I opened up for breakfast this morning.

I stamped the wood grain background onto the milk carton before I started folding it up. There will be a tutorial on the website soon to show you how to fold this up. Once it was assembled, I had fun adding the bird and flowers and leaves. The "hole" is actually just a small circle punched from brown cardstock and glued to the milk carton.

For the roof shingles, I cut some strips of brown cardstock, punched the scallops on one edge, and adhered them to the top of the milk carton. For a little extra oomph, I used my fingers to pull out the scallops and give the tiles some dimension.

If you were to create a birdhouse, what color would you use? What embellishments would you put on yours? I'd love to hear your creative ideas! :-)


Die Cut from Creative Cuts and More:
Milk Carton - smooth vanilla cardstock

Stamps:
Country Charm Textures from Cornish Heritage Farms

Ink:
Antique Linen distress

Other cardstock:
brown and green Bazzill papers from Creative Cuts and More

Embellishments:
chipboard bird - Maya Road
flowers - Prima
leaf punch - Martha Stewart
pearls - Basic Grey
circle punch - EK Success
scallop edge punch - EK Success
Broken China distress crackle paint

Friday, July 23, 2010

Christmas Card Kit Extras!!

Hi Everybody!
It's Noelle posting, a little late, I have had some computer issues.
In the blog hop I was the lucky one to do the card kit! I mentioned there was a TON of left-over product! Well I whipped out this layout in just a few minutes and there are still MORE leftovers!

Trust me, you NEED this kit! It's AWESOME!!

Thanks for stopping by today!


Thursday, July 22, 2010

BLOG HOP WINNER!!!

Hello!!! Please contact customerservice@creativecutsandmore.com to receive your Gift!

Congratulations to the following WINNER of the Christmas Card Kit!! And the winner is...


Beverly S. said...

I subscribed to the Creative Cuts and More newsletter. So one last entry for the great prize! :) Thanks again for the fun blog hop!!!


Please collect your prize within 7 days or we will choose new winners!

Thank you for HOPPING along with us!!! Have a GREAT day!


Tuesday, July 20, 2010

Icy Ornament

Hi guys! Becky here today. I just couldn't resist sticking with the "Christmas in July" theme after having so much fun during the July Blog Hop (scroll down if you missed it)!!!

So, today I am sharing an ornament I made from the Pyramid Box on the Creative Cuts & More Store - with a little twist...

I knew I wanted to use a photo I took a few years ago of an ice storm that came through Kansas while I was visiting family during the holidays. So, I decided to turn the pyramid box upside down to allow for the fullness of the tree at the top. Here's the original photo:
Isn't it just GORGEOUS?!! I know the ornament doesn't do it justice, but I still think it's a fun use of the photo, don't you?! (If you want a little more detail on how I made it, go to The Scrap-a-Teeny Girls' Blog for more detailed instructions.)


On the pyramid itself, after tracing/cutting out all the triangles, I used a tape runner to attach all the photos, punched a hole in top for the hanger & then I stickled some of the branches in the photo to give a more "icy" effect.  When that was all dry,  I used the Killer Red Tacky Tape to put the pyramid box together, & hung the bell/flower with some silver thread...

(The flowers are cut using some CuttleBug dies I had out of adhesive tin sheets from my supplies)

Hope you liked my little project!
We'd love to see what wonderful things you've been up to!
Leave a comment with a link so we can all check it out!
Cheers!!!

PS - Kim is still laid up, but hopes to be back in action for our post next week!! Thanks for all the well wishes!!

Sunday, July 18, 2010

JULY GUEST DESIGNER...

Although it is mid month, we have had a Guest Designer! We are so excited to introduce you to Jan Tatomir...

Here is some information about her...


I was born, raised and still live in the great state of Michigan with my DH of nearly 18 years.
I am a SAHM of three boys, ages 15, 14 and 7.  I have always enjoyed crafting in one form
or another.  I started scrapping about 12 years ago.  5 years ago I started making cards so I
could use all the "pretty" papers and  embellies I saw at the scrapbook store!  Thanks for
letting me play with you this month at Creative Cuts & More!

You can see some of her work on her BLOG

Here is a special project she made and in her words what she created!


I love the fact you can get these cards with the shape already cut out!  Creative Cuts and More has a wide variety of different cut out cards!  You can find them here.   I decided to play off the star and make it a little boy's space themed birthday card.  The inside reads, "is out of this world!". 

Friday, July 16, 2010

Stylish Things...

 . . .. . . . . .. . . . . . . . . .  . . . .  . . .. . . . 
I have special treat for you today. 
It's not a card, it's not even a box.
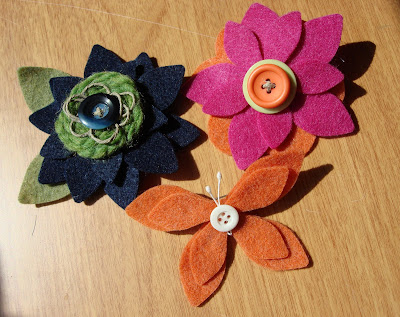
I ordered a boat load of felt flowers from 
STYLISH pins with them. 

I wear one on my shirt, real original, right!? But you could pin one to your bag or purse. I will show you how I made the leaves and the butterfly from a flower.

Here I used the Flower #6 set in Navy Blue Felt.
I coiled up some green yarn, added some twine and
stitched it all together with a button.

For the leaves, I cut away two petals from
a medium Flower #6 (in Olive Felt) and hot glued
the petals and the pin to the back of the flowers.

These pins were FREE,
they were headed for the trash at my old job.
That was well over 4 yrs ago but I knew
I'd find a good use for them! ;)

Next is the butterfly pin made from  
Orange Spice Felt flowers.

Isn't it DARLING!?

This time I simply cut off one petal, layered two sizes onto one another with hot glue, a button and a little sprig of fancy wire. Too easy! Just be careful with the hot glue gun, it gets supa, supa HOT! ;)

So, there you have it, 
a little trio of cuties to keep or share 
with your most stylish friends!
 . . .. . . . . .. . . . . . . . . .  . . . .  . . .. . . . 
I made way more than three, BTW.
 . . .. . . . . .. . . . . . . . . .  . . . .  . . .. . . .  

So what Stylish Things are you working on these days? I'd love to hear what you are doing with your die cuts that are a little unexpected. Leave us a link so we can check it out.
 . . .. . . . . .. . . . . . . . . .  . . . .  . . .. . . .  

Thanks for stopping by!
Scroll down to experience our Christmas in July hop!!!

Monday, July 12, 2010

Christmas in July Blog Hop


Welcome to the Christmas in July Blog Hop for Creative Cuts and More! You are in for a GREAT treat! Our Designers are very excited to share some Christmas projects and ideas with you, so you can get a head start on your Holiday cards and decorations!


Don't forget on the NEW website have over 100 NEW Die Cuts AND a NEW section called GREAT DEALS

Once you are finished HOPPING along the Blog Hop, you will have an opportunity to win one of the WONDERFUL CHRISTMAS CARD KITS! This Christmas Card Kit is packed with FUN die cuts, ribbons, cardstock and materials for 12 cards! You will get 6 full sheets of Designer papers and a package of ribbon - even some adorable stamps that you see featured here. 2 sheets of Rub Ons too. You will have a lot of materials remaining to make even more cards when you have completed these 12 cards. Everything you see here is included in the kit! Just add adhesive and your creative juices and you will have so much fun! 

Ways to win this wonderful prize (see picture below)

(A) Leave a comment on this post. (This is limited to one per person unless you meet the criteria of B, C, and/or D below.)


(B) Leave one extra comment if you've posted a link to this blog candy on your own blog. Make sure to include a link to your specific post in your comment.


(C) Leave one extra comment if you become one of our blog followers. See the right-hand navigation column to follow us.


(D) Leave one extra comment if you click over to our new page on Facebook and become a fan.


(E) Leave one extra comment by commenting on ALL of our talented Designers in our Blog Hop!


(F) Leave one extra comment by another chance to win subscribe to mailing list at www.creativecutsandmore.com


. . . . . . . . . . . . . . . . . . . . . . . . . . . . . .
Here are a few Sneak Peeks . . . . enjoy the Hop!

Blog Roll...

Have fun and don't forget to come back for your chance to win!

One last thing, and this is for everyone....

 Use this coupon code at Creative Cuts & More,
it's good through July 18th!

Saturday, July 10, 2010

Lapis Lazuli Snowflake card


How about a Christmas card today? Does this one make you think frosty thoughts? This is a fun and easy card that anyone can make. Just order a batch of cards and chipboard snowflakes from Creative Cuts and More, and then turn your kids loose with the glitter. They will have a great time making a bunch of Christmas cards for your stash.

I used the 5 1/4" Square Scallop Card in Ice Gold cardstock and a Snowflake #01 - Large cut from heavyweight chipboard. The Ice Gold (Curious Metallics) is a gorgeous shimmery cardstock, and it is a nice sturdy thickness that can stand up without buckling under the weight of the glittered chipboard.

I covered the chipboard snowflake with liquid adhesive and covered it with the blue glitter and set it aside to dry. Then I pulled out my 1/4" Killer Red Tacky Tape and adhered a couple of lengths of it to the bottom of the inside of the card. I wanted the scallops to pop up so I covered the tape with the same blue glitter and shook off the excess. Don't you love the way the scallop edge stands out against the glittery edge?

You and your kids would have a great time making these cards in so many different colors. You can pick up the cards, the snowflakes, the tacky tape, and many different colors of glitter at Creative Cuts and More today. Have fun shopping and getting glittery!

Check back here on Monday for the Christmas in July blog hop. We will have lots of great Christmas-y ideas and inspiration for you, and you don't want to miss this. There is a fabulous prize waiting for a lucky commenter!!

Die Cuts from Creative Cuts and More:

5 1/4" Square Scallop Card - Ice Gold (Curious Metallics) cardstock
Snowflake #01 - Large - heavyweight chipboard

Other:
Killer Red Tacky Tape from Creative Cuts and More
liquid adhesive - Tombow
Lapis Lazuli glitter - Martha Stewart Crafts

Thursday, July 8, 2010

Accordion Mini Album Tin set

Hello! Kayla here to share another project today!
I used the Rectangle Accordion Mini Album with Layers and Tin Set.
The set came with the tin and the base and layer for the lid cut just perfect! I used a Scenic Route rub-on and My Minds Eye acetate flowers to decorate the top.
The set also comes with another piece and layer I chose to put on the inside of the lid.
The accordion and layering pieces are all part of the set. It was super quick and simple to put together. I was going to add bits of papers once I figured out which photos I want to put in it.

This would make such a fun, quick and simple gift! I definitely want to make more!

Monday, July 5, 2010

SAME CARD, DIFFERENT LOOK

Hello! Today, I am sharing with you TWO cards...they are the SAME exact Die Cut from Creative Cuts and More BUT offer you TWO totally different looks!

These projects use the A2 Rectangle Window Card. I love these window card frames. They are perfect for any Stamper who wants to make a card that offers you an entirely different look in a short amount of time!


Here are some more details:
Cardstock: Creative Cuts and More Rectangle Window A2 card, White
Accessories: Versamark, Gold EP, Heat Tool, Corner Rounder, Gold Ribbon


Cardstock: Blue and white - CARD is a DIE CUT from the Creative Cuts and More, which helped make this card FAST and FUN! Rectangle Window A2 Card
Accessories: Star Eyelets, Ribbon, Star Stamp Background, Red Ribbon

Thank you for stopping by! Have a wonderful day!
Chrissy D

Friday, July 2, 2010

CUSTOMER SPOT LIGHT

Hello! Happy Fourth of July! Today we are putting the Spotlight on our talented customer, MELISA WALDORF

She was in patriotic mode and decided to create a card using one of Creative Cuts and More's window cards.  CC&M produces a fun selection of window cards using various shapes.  You can check them out  HERE.  You could have alot fun creating with these!

Stamps : PTI, Stampailities (word star), Limited Editions (title)
Ink : VersaMagic Night Sky

Thank you for stopping by! Have a safe and fun weekend!