Friday, July 29, 2011

CC&M -SOUS Joint Blog Hop- Mini Albums

Welcome everyone!!!

Today Creative Cuts and More is doing a joint blog hop with Stuck On You Sketches (SOUS) and have we got a wonderful blog hop between both our teams!

The hop will run from Friday, July 29th (7am Eastern time, 6am Central time, 5am Mountain time, 4am Pacific time) till Sunday July 31st, Midnight.

Today's hop is all about SUMMER and Creative Cuts and More has a lot of albums perfect for all of your summer activities.

The spectacular prize is this Sea Life Album Kit.
This is what you need to do to be entered to win the prize:

Become a follower of each blogLeave a comment on each blog
And finally
Be a follower and Leave a comment at Die Cut Diva,
letting Terry know you stopped, and commented at all the blogs.
You won't want to miss any of the albums everyone created.

Creative Cuts and More is also offering a 20%discount this week. Just use discount code SOUS20 during check out to save 20% off your entire order!
Here is the line-up for you to follow
We have included the linked names and also the blog address.
We will be showcasing the minis in alphabetical order.
The blog hop STARTS AT SOUS STUCK ON YOU SKETCHES

Die Cut Diva, will then pick one lucky winner that will win this amazing blog hop giveaway that is sponsored by Creative Cuts & More...

The winner will be announced on SOUS,and on DieCut Diva , on August 5th, so do stop by and see if you are the lucky winner.

We have a special treat for you today.

Our talented Noelle has created such an adorable mini recipe book using


Noelle ordered some extra pages in acetate for covers and fun pages.

The cherry # 1 was used on the recipe card.
The cherries at the top are an ippity set called New Season New Wonder.


The Watermelon slice was used. The Ice-cream #4 was decorated with lots of stickles. The recipe card is a Susan Branch stamp.


The Ice-cream cone #4 is decorated with seed beads and glossy accents. The Knife - Fork - Spoon #01 Set - Large were ordered in chipboard and paper to make them sturdy enough to hang off the page. The ribbon is from Hobby Lobby.


This is an acetate page, same thing on this side. The orange is by ippity New Season New Wonder. Recipe card is a Stampabilities.


Another acetate page. The Banner #1 - Small.


Acetate page again,and apple is another New Season New Wonder.


Isn't this a wonderful mini album? So glad Noelle could share with us.


Now off you go to start the blog with STUCK ON YOU SKETCHES- I know they will start us off with a BANG!!!


If you are done hopping and commenting on all the other blogs- then please leave a comment .

Remember Creative Cuts and More has the 20% discount this week. Just use discount code SOUS20 during check out to save 20% off your entire order!


Thank you so much for hopping with us today.

Wednesday, July 27, 2011

More Relay For Life Cards

Hi! It's Noelle posting today! I have a few more cards to share.
I love window cards! There are so many choices. This is the Filigree Rectangle Window A7 Scallop Card - Vertical. I used the Awareness Ribbon #02 - Small cut in velvet in the inside.

This is a bad picture but there is a very pretty covered in glitter Awareness Ribbon between the 2 purple ones, it just doesn't show up well in the pictures. I have never turned this Gate Fold Crescent A2 Card with Band side ways before. I love how it looks like an envelope, but it is really a card.
Here is another window card. The Awareness Ribbon Window Square Scallop Card - Horizontal. I love that you can get your cards in Horizontal or Vertical.
Thanks for stopping by today! This is the weekend for Relay For Life. Please keep all the walkers in your thoughts.
Don't forget Friday is our blog hop with SOUS!

Tuesday, July 26, 2011

There's no place like home...

Hi all!
Becky here today to share a little Wizard of Oz card I made for a girlfriend using the simple A7 Card in Candy Apple Bazzill CrissCross cardstock!
(Poppy photo courtesy of Wikipedia)
I decided to cover the front of the card with an image of a poppy field I found online. Then I layered over the bottom edge of the field that great checkerboard! It's actually a stamp I got from Lost Coast Designs! I embossed it in TH's Antique Linen Distress Embossing Powder for my "Yellow Brick Road." Dorothy was then "popped" onto the road. (I found her at a local scrapbook store, but forgot to see who make her!)
Inside, I added a stamped ATC card with this perfect image from Stamp Camp! I stamped it 2x - one on the card itself, then again in glue on another scrap to glitter the shoes & then added them on top of the other image. Viola! "Ruby" Slippers!!

http://www.stampcamp.com/catalog.html
That's it for today!
See you in a few days for the big
CC&M Summer Mini Album Joint Hop with SOUS!!

"There's no place like home!
There's no place like home..."
Designer: Becky Voth

Monday, July 25, 2011

More Relay For Life Cards

I have a few more quick cards to share today that I made for Terry- Creative Cuts and More and the Relay For Life Cancer walk.

Awareness ribbon # 2 small was used on this simple design.The middle one is pop dotted for dimension.

A stamped background and flower peeking through.
For this design- I started with a very basic A7 card base and added some DCWV glitter paper.
Flowers from my stash
So glad I could share a few more cards for the Creative Cuts and More store

Sunday, July 24, 2011

Life Is Short

It's Nora Anne here today and I love ice cream! It doesn't have to be summer, it can be 10 degrees out and I still want ice cream :) This card was so fun to make and so easy starting out with the pre-cut and pre-scored A2 card in Bazzill Canvas Raven Black. I love grabbing the pre-cut card bases, it cuts out time and gives your project a clean look since they are scored perfectly every time!
Have a great Sunday, why not stop by Creative Cuts and More and stock up on some of your own card bases and lots of other fun stuff!
 

Saturday, July 23, 2011

Birthday Box

Good Morning Everyone! It's Danielle, and my project for today was this little adorable Square Box. I wanted a small box that I could decorate on my own for a little gift. This was perfect. So I made the box, added the ribbon and my favorite birthday stamp. It was easy to make and will make my gift look that much better.

Stamps: Hero Arts
Markers - Copic

Hope you enjoyed this, have a great day :)

Friday, July 22, 2011

More Relay for Life Cards

Happy Friday!!!

Recently, Terri, the owner of Creative Cuts and More asked the members of the Die-Cut Diva Design Team if we would like to contribute some hand made cards to her daughter's Relay for Life team for a basket they were auctioning off.

Terri sent me a bunch of wonderful die-cuts to create with and I made four of each of these designs for the auction basket.

This first card was made with Circle Window A2 Card with Mat inPrincess Bazzill Criss Cross &  Cupcake Bazzill Criss Cross cardstock and Awareness Ribbon #02 - Small cute from Princess Bazzill Criss Cross Textured

The stamps are from My Favorite Things "Think Pink" set.


This card is made from Awareness Ribbon Window A7 Scallop Card Horizontal in Pajama Bazzill Criss Cross cardstock.

The image is from Stamping Bella and the sentiment is My Favorite Things.


The third card was made from Awareness Ribbon Window Square Scallop Card - Horizontal in Princess Bazzill Criss Cross cardstock.

The sentiment is a digital sentiment from

The last card was created from a A2 Card  from Cupcake Bazzill Criss Cross Cardstock.
I used a Shoe Card die cut which I cut in half and decorated with Sassy Circles stamps and a sentiment from Sassy Shoes by Paper Pretties.

These dies cut cards can be cut in any color for other Cancer's and could be used for Military cards with yellow ribbons too!

I hope these card designs got your mojo flowing!

Have a great weekend!

Kristine

Thursday, July 21, 2011

Barbecue Invitation

Hi everyone!! Fern here, and today I have a card to share with you that I created using the Barbecue Grill #01 - Small in Stardream Metallics - Onyx over at Creative Cuts & More.. This is just the right size for a card and there is a larger one if you want to use it on a scrapbook layout, which would be just too cute!! I made a couple of these cute BBQ invitations to send out to my family.. The kids and grandkids were thrilled to get these in the mail!! They turned out so cute and very easy to make..
BTW the stamp says "It's time to party with the grill master" :o)

Here's what I used..
Stampin Up ~ Basic Black CS
Stampin Up ~ Old Olive CS
Scenic Route CS
Stampin Up Big Shot Top Note
Cuttlebug Houndstooth Embossing Folder
Stampin Up ~ Only Ovals Stamps
VersaMark
Black Embossing Powder
Jewels
Ribbon
And don't forget your Killer Red or White Tacky Tape to hold it all together!!

Thanks for dropping by and be sure and check out the new die cuts being added daily over at Creative Cuts & More!!
Have a great day!!!
Hugs!!

Wednesday, July 20, 2011

Come On Baby, Let's Do The TWIST

Good Morning Bloggers!  It's Noelle posting today and I'm late!  Yesterday when the lightening took out my power I knew I lost 10 hours of NOT saved work, [save, save,save!!]  But the don't forget to do your blog post slipped my mind!
Have you tried the A2 Twist card yet?  I LOVE it!  It comes together so quick!  I love that it's not a typical card and fun for whoever receives it! I used the A2 Twist Card with Layers, but I only used one layer this time.
Creative Cuts has several Twist Card Assortments as well if one just isn't enough!
All the stamps are by {ippity} and that ribbon is by Hobby Lobby!
Thanks so much for stopping by today!

Tuesday, July 19, 2011

Who Wants Popcorn?


Hi everyone! It's Taylor here, sharing a fun project today.  I adore this little popcorn box from Creative Cuts and More!  I snazzed it up with some gorgeous stickers.  They have a luxurious velvet feel to them - so lovely.  The brown stickers really "pop" (hahaha - I crack myself up!) with the Bazzill Lime Crush card stock.

I added a bit of bronze ribbon to my popcorn box, and a little tag using a large sentiment.

This whole thing came together really quickly, thanks to the great die cut from Creative Cuts and More. The popcorn box comes precut and scored, totally ready for assembly.  It's best to put it together with some Killer Red or White Tacky Tape.  It will make your life much easier, I promise!

Supplies: 
Stamps: Happy Messages (Stampendous Perfectly Clear Stamps)
Card Stock: Bazzill Lime Crush
Ink: Memento Rich Cocoa
Accessories: popcorn box die cut from Creative Cuts and More; May Arts ribbon; thread; Jumbo Damask Leaf & Scrollwork Border Class A'Peel stickers (Stampendous)

Monday, July 18, 2011

Grow Your Wings

Hi All! It's Nora Anne here today sharing a cute little gift card holder with you! That's my plan anyway, to use it as a gift card holder by attaching the gift card to the tag and writing a message on the back, but it can be used as a gift tag, or a hidden journaling tag on a scrapbook page as well.

(sorry for the bad photos, I don't have my good camera right now)


I started with the Scallop Circle-11 1/2" (see it's not just for scrapbook layouts!)  I cut it in half.

Then folded it in to the center. Put some tape along the bottom and the flap to close the bottom and add your embellishments. Easy peasy! and you can make two with each Scallop Circle! A quick and easy project that comes out super cute!
Thanks for stopping by today! HAPPY SHOPPING!

Sunday, July 17, 2011

Slash Pocket Card

Hi Everyone! Danielle here, showing you something I made recently. The Slash Pocket Card came to me at the perfect time. My best friend is having a birthday. Since she is a bright, bubbly person I thought that is how I would make this to match. I loved this card, it's different from a traditional card and so fun!
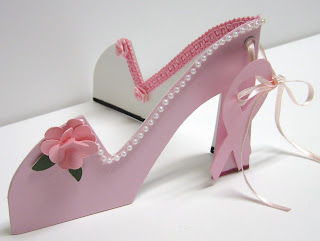
Then for the inside I wanted to make it look like the birdie was wishing her the birthday greeting so I stamped him, colored him in and drew a word bubble.


Stamps:
Hampton Arts $1 stamp from Michaels

Other:
Yellow Glitter - Stickles
Markers - Copic
White Gel Pen - Uniball
Alphabet Stickers - Cosmo Cricket

Saturday, July 16, 2011

Relay For Life

Terry owner of Creative Cuts and More asked many of her team if we could help with a project close to her heart.
Relay For Life for the American Cancer Society is the event
She asked for some finished cards to sell at the event’s silent auction.The team is called the Sole Sisters- so shoes are the theme.
I used Shoe Card for the base.

This is a A-7 Scalloped Card base


I used various materials for these shoes- Lets say I showed you all the blinged up cards this time. I will share the rest on another post.
Did you know you can order any of the Cancer Awareness products in various colors from Creative Cuts and More?

Friday, July 15, 2011

Butterflies Fly Free (LOTS of picts & text!!)

Hi all!
Becky here today to share another Out-of-the-Box idea with a Peek-a-View Box "Lantern" & the fabulous new Butterfly Assortment from Creative Cuts & More!!
When I first saw the Butterfly Assortment, I knew that I wanted to play with it! How could you not? With 3 different sized butterflies cut in all sorts of fun materials!!
Hanging Butterfly Lantern
I love working with the Peek-a-View Box for things other than its intent! It's such an easy product to think of different ways to doctor it up!! So, I got this crazy idea to cut a hole in the bottom & fit one of those battery-operated tea lights inside! Because it's meant to be hung, I had to tape the "peek-a-view" (acetate) portion to the cardstock part so that the bottom wouldn't fall out. Because of that, I needed the light to poke out a little from the bottom so that I can turn it on/off & change the battery when needed.
View from the bottom
(But, I did glue the tea light to a piece of floral foam inside so that it was more anchored in the hole in the bottom.)
Tea light inside
After I figured out the logistics of the light in the box, the rest was just plain fun! I added alcohol ink to one side of the acetate from the box to look like stained glass, and did the same to 4 vellum butterflies from the Assortment. 
Alcohol Ink on the acetate of the box
While that was all drying, I pulled out the Glimmer Mist in 2 shades of blue & added that to 3 of the "dictionary" butterflies & one aqua cardstock butterfly. When those were all dry, I used some Red Tacky Tape to attach one vellum butterfly to one dictionary butterfly for the bottom hanging ones; and the larger vellum butterfly to the cardstock one for the top. Using fishing line, I strung a length between the layers to hang from the bottom.
Bottom butterflies
In order to hang all the butterflies, the dominoes & suspend the entire thing from more fishing line, I used my crop-o-dile to put holes & eyelets in the top (4) & bottom (3). The top butterfly is attached with a dab of Aileen's Tacky Glue just on the bottom of the wings (That stuff is like cement!!).
Top of lantern butterfly
For the box itself, I inked it all over with walnut ink & added some Antique Brass Distress paint to shabby it up. I found some great images on Etsy for the dominoes (I drilled a hole in them & inserted an eye hook with my Dremel) that fit right in with my theme!
Top Domino - "Land of Enchantment" shop
Inside Domino - "Magicpug" shop
That's pretty much it! Hope you enjoyed my little treasure!
Here's just a few other things I've done with this great box...
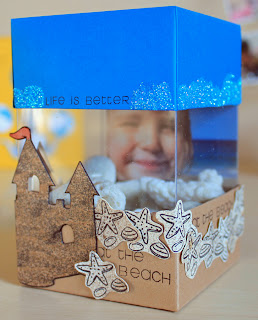
For holding sea shells

For holding scary candy corn!
Or just a crazy circus box!
Don't forget to hop on over to Creative Cuts & More to order your own Butterflies & Peek-a-View Boxes to play with!!
See what kind of crazy creations you can do with them too!!
TTFN!!

Designer: Becky Voth