Wednesday, August 31, 2011

Chinese Take Out Box

Happy Wednesday!

I hope your week is going well so far!  

Today I have a fun little small Take out Box die cut to share with you.

I decorated it using Flirty Fortunes stamp set by Paper Pretties Stamps and some wire that I had in my stash.


This little box is the perfect size to hold a couple of sample size massage oils...a gift card to a Chinese restaurant or heck....a bunch of chocolate would be "thrilling" to me!

What a fun way to present a little something to your special someone...


Stamps:
Flirty Fortunes stamp set by Paper Pretties Stamps 
Paper:
small Take out Box by Creative Cuts & More
Neenah white cardstock
Ink:
Memento Tuxedo Black dye ink
Copic Markers
Other:
Craft Wire

I hope you got a little inspiration from my project today.  There are a ton more great die cut boxes at CC&M so be sure and check them out!

Kristine

Tuesday, August 30, 2011

Marie Antoinette - 3rd Post of 8x8 Album

Hello & thanks for stopping by today!
I was really hoping that I would have a finished project to share with you today, but I'm afraid life interrupted my progress on this one! But I do have a few more pages from my 8x8 Window Album to share with you today & I hope to be able to spend some time in my studio this week & at least finish the last few pages!


(Marie dolls compiled from a digital collage sheet)
This is my favorite page from this grouping. I just love that so many people think that Marie actually said "Let them eat cake!" The paper dolls were made from a digital sheet I found on Etsy & the cake is cut from a Cricut cartridge. The gold embellies are actually imported German Scrap. (The text is cut from a book.) The background paper was stamped & clear embossed with a cupcake stamp & then sprayed with Glimmer Mists (wiping the mist off the embossed images). I also used Stickles to highlight some of the flowers on Marie's dress & in her hair.
Do you ever get to working on something & it just doesn't seem to come together like you wanted? Well, that's what happened with these two pages! They were supposed to be all about Marie's "Pouf" (hairstyle) & fashions. But I couldn't quite get it to work, so this is the result...
One, super busy page of collaged images:
And, another not quite completed page that will hopefully get some more stuff on it soon!


the green "fan" piece swings up to reveal an empty spot at the moment!
These two may end up being tossed out when I get the whole book finished! I'll just have to see how it all works together!

That's it for today...I really do apologize for not having the finished book to show you! Hopefully in by the end of the week!
Thanks again for stopping by & don't forget to visit the CC&M shop for all your mini-album needs!!
- Becky

Designer: Becky Voth

Friday, August 26, 2011

A Sliding Pop-up

Hello! I've got a Sliding Pop-up Card from Creative Cuts and More to share with you today!

Here's the front or "outside" of the card.

I used Neenah Smooth White and Bazzill Canvas Leapfrog. After stamping my image on the Neenah white I sponged with Distress inks.
I love these Sliding Pop-ups as they're different from your "normal folded" card and being cut and scored already makes it a cinch to put together! Just add a little Killer White Tape!

And the inside....


I added a piece of white to the inside and left it blank to write a note to the receiver.

Be sure to check out CC and M, Terry has added lots of new items, lots of fun!!

Thanks for stopping!
Dawn Lusk

Thursday, August 25, 2011

Gatefold Crescent Stork Card

Hi All!!!

Today I've made a Gatefold Crescent A2 card with Mat and Band to share with you.  

I used Petunia and Romance colored cardstock by Bazzill Basics.  This is a great die-cut card because it comes all cut out and scored and is really easy to decorate and put together with some Killer Red Tacky Tape!

Have you checked out CC & M?  You can order any of the die-cuts in any colors that you want.  Terri has hundreds to choose from!

Here's the outside of my card.


The band slides right off.  Here's the inside:


There is no way that I would be able to cut those rounded edges evenly which make this gatefold card so special and unique....well worth buying a ready made die-cut card!

Thanks for stopping by to see us!

Stop by again soon!

Kristine

Wednesday, August 24, 2011

Tags are hot! Just like summer!

Hi Bloggers!  It's Noelle posting today and we have a guest designer again today!  Alumni design team Member Carla Mayfield is back in the house!  This Tag Pocket Card with Tag is so quick and easy to make you won't believe it! 
I had this cut in some of my favorite Basic Grey paper. 

All the stamps are from Make Your Mark by {ippity}
The ribbon is from my stash and everything is embossed in UTEE.
She used Killer White Tear-able Tape to make the pocket.

Tuesday, August 23, 2011

Tuck Top Cube Box

With fall fastly approaching I wanted to make little box I could put something in for the teachers. Since I didn't want the traditional apple theme, I decided on nature. Owls, Tree's and orange/green hues.

I used the Tuck Top Cube Box in orange and then decorated it with ribbons and buttons.


Hope you enjoyed the little box, it makes a nice gift!

Monday, August 22, 2011

Colorful Animal Cake (MANY PICS)

Grab a cup of tea or coffee, and sit back, and join me for another FUN and COLORFUL design from Creative Cuts and More.
First I started with the XL cake slice boxes in fun and colorful ,Bazzill papers. I made the bottom layer and am keeping it separate in case I need to mail to someone.


Next I made a circus tent to adorn the top layer using the Large Cake slices. This two tier cake can be bought in a one layer set- large or X-large or a two tier box set.
These slices can also be purchased singly in large or X-large
I used some fun animal stickers that were 3d. I tried to share a view from many angles.


I used some checkered ribbon I found at HL to match those yummy Bazzill colors of paper. I even found some scrap papers from CTMH to make the banners- I like how the colors were very similar to the Bazzill papers I used for my cake slices.

I hope you enjoyed my newest cake creation- I always enjoy sharing with all of you. Hopefully you will get inspiration to create a cake or even favors of your own.

Saturday, August 20, 2011

Wedding in Red

Well I am sharing a tutorial today- I have made a decorated cake as a gift for my future daughter-in-law.
I started with a great Cake Slice Box Set-Two Tier. and Dress & Tuxedo Box Set.

Now I know I could have cut or made my own patterns- BUT please!!!

There is nothing better then having each piece perfectly cut and scored. No guess work was needed to make sure it all was the same.
Terry has great quality papers and I can customize colors and textures.
When I told Terry I wanted to make a gift for my DIL she mentioned this great idea- and told me to choose my colors. Do you know you have two color choices you can make out of dozens of colors and paper textures to make this cake design?
I really thought about making it with the brides color choices- red and white base- but went with Lily White for all the pieces.
I am going to share a few steps along the way making this beauty
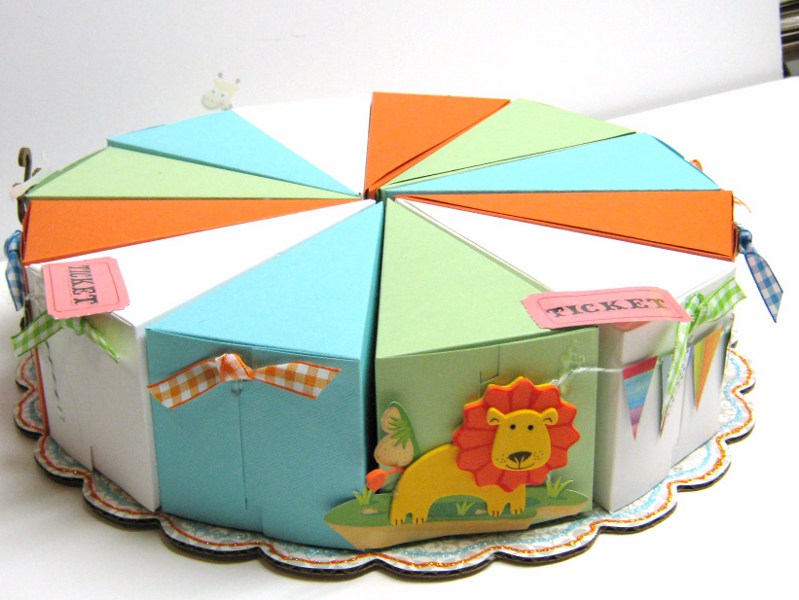
I found a cake platter and doily to use along with the package I received from Creative Cuts and More.

This is what the cake slices look like flat-I also showed how I refolded all the score lines before I started assembling. I did use some Killer White Tear-able Tacky Tape - 1/4" to all the flaps.

*** since this finished cake had to be wrapped and sent 1600 miles and I wanted to make sure it held together through everything***


Here is a couple views of the cake slices assembled

Tissue paper was used inside each cake slice to help hold the shape- again this isn't necessary but I knew I was adding a lot on the top in weight and then sending in the mail.
Here I wanted to show you how I once again pre-folded the score lines before assembling.

Assembling the tuxedo went together very quickly- just a little tape to hold the shirt in place.
I folded the lapels and taped them down to hold in place.

Now the brides dress was customized by me to match my future DIL's dress- used some white tissue paper and white tulle to make.
Here is a finished view of the extra ones that were added to the package (I did make two sets ).
On this brides dress you can see the folds and pearls.
I added a flower and leaves for the grooms corsage.


I have included a few extra views of this finished project.Ribbon, pearl bead trims, tulle, and small red paper flowers are from Hobby Lobby I also purchased the Prima flowers from Hobby Lobby.


So glad you have popped in to visit today, I so enjoyed sharing this special gift with all of you.

Friday, August 19, 2011

More Marie Antoinette Pages

Hi all, Becky here again today to share some more pages from my Marie Antoinette 8x8 album from Creative Cuts & More that I am currently working on! (First post here)
I am about halfway done & hope I can finish it by the end of the month!!


Page one - what you see through the window of the cover!


Page 2


close up of LABEL & FRAME


Page 3 & FLAG
(I forgot to take a close up of the flag, but I embossed the "pole" with gold & used Copics on the flag.) I didn't include pages 4-5 because they are a double layout that wouldn't fit on the easel! But you can see them on my personal blog, here.


Page 6


Close up of TAG CARD


Page 7


Page 8
I may still add a little some thing to this page, as it seems a little boring to me! Ha!


Close up of Petite & Small LABELS
That's it for today!
I hope to have the rest to share with you in a couple weeks!!
Hope to see you soon!
TTFN!