Monday, December 27, 2010

Wonderful Wedding


Happy Monday Everyone!!!

I hope you are getting to stay at home and enjoy a few more days of holiday/family time! As for me I am back to work but I did have a very nice weekend with family. And before the weekend came to a close I had a chance to make this fun Wedding Card.

Some friends of ours are getting married on NewYears Day. New Year...New beginnings...we are very happy and excited for them.

The card base is an Arch Window A6 Card from Creative Cuts and More. I find that this large window works really well with digital images because you can size them to fit the window exactly as you want. This image is "Wedding Couple" from In Style Stamps.

This Arch Window A6 Card is perfect for all those Wedding Cards you'll need in the coming months! Get a few to keep on hand!

Have a great week!

Kristine

Friday, December 24, 2010

Don't you just LOVE Peek-a-View Boxes?

Hi Everyone!  It's Noelle posting today. I LOVE these, they make the BEST gift holders!  I went to my work Christmas party lunch this week and as usual we had the BEST time!  I embossed {ippity} stamps with Ranger's silver EP.  Inside the boxes are hand lotion's and a monogrammed candle holder.  So I put their initials on the outside of the Peek-A-View Box too so I didn't get them confused. 
I wrapped some gold ribbon around them to keep them closed and topped them with a Prima flower!  They are super easy to make and are perfect for giving little gifts!

Thanks for stopping by today!

Wednesday, December 22, 2010

Polar Bear Matchbox...

Hi, it's Darsie posting today, and there are only 2 days left til Christmas! I have finished up all my wrapping, and crafting, but just have to show you this darling candy box I created using the Match Box #1 - Large Die Cut! It is so easy to put together and decorate! Once you're done decorating, add some patterned paper to any flavor of Hershey's Nuggets and tuck them inside the matchbox. A cute gift to leave on a co-worker's desk, for a teacher or in a stocking!

To all my friends and family and to the fabulous Die Cut Diva Design Girls, I wish each and everyone of you the Most Joyous Christmas, and a Happy and Healthy New Year!


Images & Sentiment: Designs by Leere'
Designer Paper: Tis the Season by Die Cuts with a View

Monday, December 20, 2010

CHRISTMAS GIFTS

Hello Everyone, Chris Dickinson here. It is beginning to look a lot like Christmas! 
I have two projects to share with you tonight. 

Here are the details: 
DIECUT: Tuck and Close Bag #2 perfect size for a gift card, money, small candy bars, baggy of candy, nail polish, some jewelry, etc.
Stamps are from I Brake for Stamps and Paint is from Creative Inspiration Paints.


I just LOVE the ornaments that are available at Creative Cuts and More.
Diecut: Christmas Ornament #01 Large, perfect for your tree or an addition to your gifts!
Stamps are from I Brake for Stamps and Paint is from Creative Inspiration Paints.
Thanks for stopping by and taking a peek! Have a Merry Christmas!
Chrissy D

Sunday, December 19, 2010

Awareness Ribbon Gifts by Dawn

Hello Everyone Dawn here again,
I am back today with a few more gifts I made from Creative Cuts and More products.
Some of the products I received from Terry at CC&M after winning a blog hop are part of this post and in today's.
These are the gifts I included with the package with the album I took to the cancer center to donate.


Awareness Ribbon A7 Scallop Card - Horizontal is the base I started with here.
I used the stamp set from Clear Arts to decorate and also the Ek Success border punch. The paper I used in the window is from CTMH.


Awareness Ribbon Window Square Box #01 in pink here was so easy to decorate.

I used the aggressive Killer White Tear-able Tacky Tape - 1/4" on the backside of the box to cover the ribbon, then just added a little rock crystal glitter. The stretch pink ribbon, small flowers and pearls are from Hobby Lobby.

Thanks for stopping by today until next time- take care!

Saturday, December 18, 2010

Glittered Mini Ornaments


I bought this Penny Black pine branch stamp last year and never got around to inking it up. So this year I was determined to get this stamp inky, and I ordered some Christmas Ornaments #02 - Mini from Creative Cuts and More. I ordered these mini ornaments cut from tacky tape, which meant that these ornament die cuts will be sticky on both sides.

I peeled the wax paper off just one side of each ornament and poured some Martha Stewart glitter on them. After I stamped my pine branch, sentiment, and sponged the edges, I peeled the wax paper from the back of each ornament and stuck them down on the cardstock. Quick and easy!

The layers needed a little extra distressing, so I used the Torn Frames technique from Technique Junkies on the white and brown layers. I love the contrast of this rustic, tattered feel with the elegant, glittery ornaments.


Die Cuts from Creative Cuts and More: Christmas Ornaments #02 - Mini cut from tacky tape
Stamps: pine branch from Penny Black, sentiment from Cornish Heritage Farms
Ink: Chocolate Chip (SU), Meadow (Adirondack)
CS: White, Brown
Other: Martha Stewart glitter, sponge

Thursday, December 16, 2010

OH NO! There's a Bird in my Milk Carton!

Phew! No need to worry!
It's only an ornament created with the Milk Carton Die from Creative Cuts & More!
I loved this idea when our talented DT member, Holly, made it this summer! (You can see her creation HERE.)
I first covered the sides of the milk carton in some MME papers from their Asparagus line (it has lots of glitter on it!). Then I used my circle cutter to make a hole for the bird (the bird & the sprigs came from the Dollar store!! I pulled the original arrangement apart & re-wired it to work here). 
Next, I used the fabulous Killer Red Tacky Tape to assemble the box while my glue gun was heating up! I placed some hot glue on the bird & sprigs, then placed the bird tail inside the hole in the milk carton.
For the top of the box, I punched a hole in the top, then hot glued rows of shell-buttons to make the "shingled rooftop."
  I just love it! I can't decide whether to keep it or give it to my sister who is rapidly becoming the "crazy bird lady!" 
Ha, ha! Love ya sis!
Happy Holidays Everyone!!
See you soon!
Designer: Becky Voth

Tuesday, December 14, 2010

Have you ever made a calendar?

If not, you REALLY should! Hi Everyone, it's Noelle posting today.  I LOVE making calendars, they are super fun to make! My sister once told me that the best present she gets every year is the calendar I make for her! That makes a girl feel really good let me tell you!

This is CC and M new Calendar Kit and it is FUN to put together!  You get everything you see here to assemble your calendar.
 This is how January looks or you can add some embellishments and dress it up a little! 


I added some pearls and stickles to February!  I only added Stickles to March!  It is so easy to make a nice present for someone you love to enjoy for 14 months!
What I love about this calendar is that you can make it begin with any month you want!  If you are too rushed for January, have it begin in February and tack January on at the end!
Thanks for stopping by today!  I had fun making this calendar and I think you will too!

Monday, December 13, 2010

Season's Greetings


Happy Monday!

I hope you had a great weekend!

I spent most of yesterday wrapping gifts. I am always looking for ways to wrap gift cards so that they are not obviously gift cards. These bags from Creative Cuts & More work great for giving gift cards and I always keep some white ones on hand so that I can pull them out and decorate for any gift giving occasion.

I decorated this one with some Cosmo Cricket paper and a tag that I decorated with QKR Stampede stamps, "Sledding Snowman" and "Deck the Halls".

These little Square Bags are so perfect for any tiny gift that you might have to wrap and it's so fun to customize them for the person you are giving too!
Thanks for stopping by to see my project!
Kristine

Saturday, December 11, 2010

Christmas Berry Milk Carton


I got together one afternoon with a girlfriend, and we both decided to just stamp for fun. I pulled out a new stamp set, and I just happened to notice a white milk carton die cut from Creative Cuts and More on my table. Hmmm........ let's see what happens!

I ended up stamping this silhouette floral sprig all around the milk carton, and then I sponged along the edges with some Antique Linen distress ink just for a little depth. To make this Christmassy, I added some little dots of Creative Inspirations Garnet paint.

I assembled the milk carton die cut with some Killer White Tear-able Tacky Tape, punched some holes at the top, tied a red ribbon through the holes, and added the Merry Christmas tag. This is going to be a fun gift - just fill it with candies or some other small gift for a loved one.


Die Cut: Milk Carton
Stamps: Larger than Life, Friendship Jar Holiday Fillers - Papertrey Ink
Ink: Meadow Adirondack, Pure Poppy - Papertrey Ink, Antique Linen distress
Other: linen thread, red twill ribbon - May Arts, paintbrush, sponge, Garnet Creative Inspirations paint, Killer White Tear-able Tacky Tape

Thursday, December 9, 2010

Peace on Earth Sleigh

Hello, everyone, it's Darsie! I have created an elegant centerpiece for my Christmas table using the 3D Sleigh die cut! This was surprisingly easy to make using glitter paper, and some sparkly greenery and poinsettias for accents! I just love how you can order whatever color paper you want for the die cut, then all you have to do is tape it together with Killer White Tearable Tacky Tape! Then the sky is the limit in decorations for it!

I had my card party play with the sleighs and they created some of the most beautiful sleighs I've seen! I even had one lady decorate hers with gumdrops and candy canes!! Once you're done decorating, you can fill this little sleigh with just about anything: cookies, candies, small packages or greenery like I did!!

Wishing you a Happy Crafting Season! ~ Darsie


Friday, December 3, 2010

Awareness Ribbon Window Album by Dawn

Hello Everyone Dawn here!
I am so excited to share with you that I am now a member of the Die cut Diva design Team- for Creative Cuts and More.
I was so thrilled to be asked to be a guest the past few months but even more thrilled to continue to play with more products.

Today I am going to share a project I put together using the prize supplies I won from Creative Cuts and More's blog hop a few months ago.

Now I know Breast Cancer awareness is usually in October but for me it is in December. I have chose to make this album and will wrap it up beautiful and donate to the Cancer center. I am hoping someone there will enjoy filling this album with their journey.


This Awareness Ribbon Window 8" x 8" Album Chipboard Set - Side Open was sent to me in black chipboard- you may choose to use other papers and textures or even order the pieces separately.There are eight dividers and pages included, I chose not to use all of them for this album so I will be able to order another cover and back and make a second album.


I decided to add a soft pattern paper under the ribbon window and decorate with lots of goodies.


I will share smaller views of several of the pages that you can click on to enlarge. All the supplies used that are not from Creative Cuts and More will be listed on my blog if you want more information.


I hope you enjoy the views, thanks for looking.
I will have another post in a couple weeks to show you a couple more gifts I will be including in this package.
See you soon!


Thursday, December 2, 2010

Dear Santa

Hi all!
Becky here again today to share this adorable card I made out of a simple A2 Card die from Creative Cuts & More! (I chose the very pretty Opal color from the Stardream Metallics collection of papers! It's my new fave!)

(I scrap-lifted the idea from the Nov/Dec issue of Paper Crafts Magazine; a design by the very talented Tiffany Johnson. Who was also a designer in our "Perfect Pair" hop we did with Clear & Simple Stamps.)


I ran the front of the card through the Cuttlebug w/the Swiss Dot embossing folder; added some red netting & lace from my stash around the middle & some bling dots, of course!
The typewriter is this great rub-on my sister found at Michaels over the summer! (She got the last stamp like this rub-on!) I rubbed it onto some white cardstock, cut it out & then cut a slit along the "roller" of the typewriter to insert the "Dear Santa" paper printed from my computer!  Doesn't it look so real?! I wish I had more rub-ons & time to make a bunch of them this year!
Inside of the card

That's it for now!
See you in a couple of weeks if i survive the Holiday craziness!!

designer: Becky Voth

Sunday, November 28, 2010

We are happy to introduce you to our last but certainly not least Guest Designer Dawn

We were thrilled to have her this month!  Here is a little about her in her own words:
I’m 55… a wife(37yrs), mother (of 5), grandmother (of 9) living in rural Ohio amongst corn, soybean and wheat fields. I have 3 dogs, a couple barn cats and 14 llamas. I have a llama 4H club and we show in competition, go to nursing homes (yes, we take the llamas in!) and generally have fun!

I was first introduced to paper crafting (as probably so many are) at an SU workshop. I only went because my daughter had booked a party “to be nice” from a friend. HA! What would I do with stamps? But, it was MY daughter, so I HAD to go! What can I say….. I WAS HOOKED!

I’ve always enjoyed crafting in various mediums (since I have the llamas, I spin their fiber into yarn for knitting/crocheting just for one example!), but stamping was different…not only do I really enjoy creating cards and altered items, but the joy of sending a card with just the right sentiment…sometimes “just because”, to a person at the RIGHT time and giving them encouragement or just making them smile and feel “special” is so rewarding!

I do freelance work, have served on many design teams, and have quite a few magazine publications under my belt. So far the highlight was being asked to help illustrate a coloring techniques book by Annie’s Attic! I do love to color. Thanks to Terry and Creative Cuts and More for asking me to be a Guest Designer this month!


 This pop-up card is so pretty!  To get the details and see the inside check it out HERE.
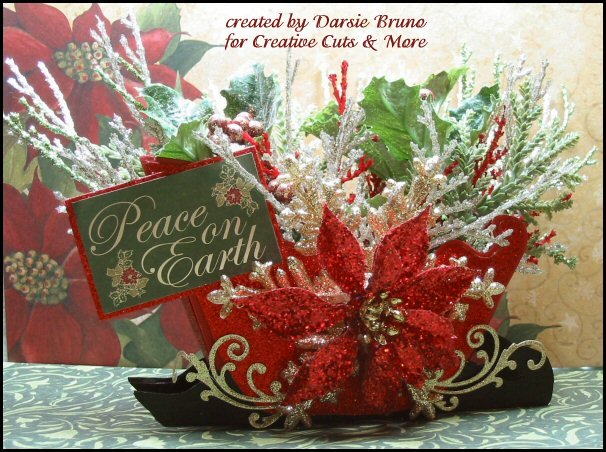
I can't get over her cute this Box With Handle and Layer is!  To see more about it visit her blog HERE.

Dawn, thank you so much for joining us this month!  It was a pleasure to have you and we can't wait for you to come back!

Saturday, November 27, 2010

Candy Cane Sleigh


Did you all have a great Thanksgiving? It's so hard to believe that Christmas is now less than a month away! Wow!

I ordered this 3-D sleigh die cut from Creative Cuts and More, stamped on it with a candy cane stamp using Versamark, and filled it with mini candy canes from Walmart. There is a good double handful of candy canes in this sleigh, which is plenty of room for your holiday candies. Wouldn't it be fun to have several of these around your living room for your friends and family to help themselves?

Die Cut: 3-D Sleigh
Stamps: Flourishes' Sweets of the Season
Other: Killer Red Tacky Tape, Copic markers, mini candy canes

Friday, November 26, 2010

Happy Black Friday!

Hello!! It's Noelle posting today! Did everyone shop? I am happy to report I am still in my PJ's and slept in until 7:45! I'll do a little online shopping this afternoon! Did you know that Creative Cuts & More is having a sale? You get to pick your own coupon! One is for 20% off anything in the store and the code is cybermonday. The second coupon is for free shipping in the US with a minimum order of $25.00. That code is blackfriday. Both coupons are good through Monday. Only 1 coupon can be used per order. How great is that?

I made this card for one of our design team members, Kim! It's an A2 card that I had custom cut in Bazzil Bling, which I ADORE! Then I used a scrap of SU Kraft to stamp the {ippity] background stamp on. Then another scrap to stamp the image on. That is another {ippity} stamp and I embossed it using Ranger Black EP. The ribbon is from Michael's and the jewels are by Doodlebug! I put the whole card together with Killer White Tear-able Tape!!

Thanks for stopping by today! Have fun shopping and don't forget to use your coupon!

Wednesday, November 24, 2010

Waterfall Card!

Hi, it's Darsie! I created this Waterfall card using an exclusive diecut from Creative Cuts and More. When you pull the tab on the card, you'll see more birds! My bird images are from Fred, She Said! I just love making Waterfall cards and Creative Cuts has made it so easy! No more measuring, cutting, or trying to figure out the mechanism! Nothing like an interactive card!!

I wish everyone a Happy Thanksgiving filled with love, laughter and lots of good food! Be Thankful for all you have as you never know when it will go away!!! 


Tuesday, November 23, 2010

To Sum Things Up...

Hi all!
Kim here today & I don't know where the time has gone this month!
As the Holidays wind up & the year is winding down,
I thought I would do a little re-cap of some of the projects I did this year with the
great dies from Creative Cuts & More...

Celebrations HERE...my Birthday creation is about halfway down...
 4th of July Freedom Mini-album HERE...
A Wedding Ensemble HERE, scroll down about halfway to see my creations...
Using Leftovers HERE...
 The Perfect Pair Hop with Clear & Simple Stamps HERE...
 Boo Bites HERE...
Halloween Mini Album HERE ...
Spooktacular Match Box HERE...
 Thanksgiving Place Cards HERE...
 Apron Recipe Card HERE...

Thanks for joining me on a trip down creative-memory lane!
I hope you all have a wonderful Holiday Season & I'll "see" you again soon!

designer: kim langhorst