Thursday, April 23, 2009

Double Mate mini mini album


This tiny little album isn't usually the size that I work on, but boy, was it a fun new adventure! This little album fits inside a candy/Altoid tin and is an accordion album. I had Terry cut it out of DoubleMates Cardstock in Icy Indigo. (It even sounds snowy, doesn't it?) The album came with two covers and I got the layers that go on each fold of the accordion too. The Snowflake? Well it was Snowflake #04 small out of Pearlescent Swirlette. It is just gorgeous!!

This is what it looks like when I opened it up. I used one of the layers and stamped on it and journaled on it. The accordion album is on the right. The Stamps are from Stampendous, out of their Jumbo Tree set. I stamped the swirl using White ink on the right and blue in on the panel on the right. The snowflake is Snowflake #01 in pearlescent swirlette.
I used the Circle Scallop Frame to highlight the single photo on the layout. The snowflakes (Snowflake #01 petite) and frame both were cut from Pearlescent swirlette. The title is done with white rub-ons from Autumn Leaves I did carefully measure and cut the photos, frames and snowflakes so that they would more easily fold into the candy tin and lay flatter when folded.

On the other side of the accordion album, I also placed only one photo. I again carefully cut the photo and the snowflakes, then stamped them. The dark blue cardstock on this layout is the layers that came with the album. I turned them to a landscape orientation instead of using each layer vertically on each fold. I love the DoubleMates cardstock because it is one color on one side and a complementary color on the other. No need for covering the album or changing the color of the cardstock!! It was a little tricky to get the layers just right on this layout. I wanted to cut the snowflakes at the fold so the album would lay better when folded...but it was tricky, tricky. Then I adhered all the pieces together.

This is the back cover of the candy tin. I used Snowflake #01 petite cut from the DoubleMates cardstock. Here you can see that both sides are a lovely color and go together so well. If you are covering mini albums or want tags or other embellishments made, this is a great way to have an embellishment that you could use either side of. Also, this cardstock would work great in an acrylic album because both sides are colored and you wouldn't have to worry about covering up the white backside of a piece of paper!

Wednesday, April 22, 2009

Got Hockey?


Did you know that Creative Cuts and More carries fabulous shapes? In our family hockey is our all time favorite sport, so I was so excited to get some die cut hockey sticks and pucks. Creative Cuts and More's die cut shapes work great for cards and 3D projects, but they are also fantastic for scrapbook pages.
Check out all of the fabulous die cut shapes and see what amazing projects you can create. As always please leave a comment and share any of your Creative Cuts and More creations.

~Pam

Die Cuts: Heart, Hockey Stick and Puck set, Scallop Square Window Card
Stamp: Studio G

Friday, April 17, 2009

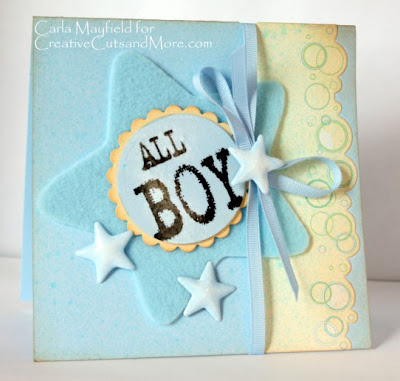
Sweet Felt Star

Design Team member Carla Mayfield is no stranger to cards for boys... she's the mother of three boys! Here's her story of the cute felt star that she received and the card she created:


"Terry, the owner of Creative Cuts and More, sometimes send me random cuts from her extensive collection. I love going through these and thinking up a project for them. Today I wanted to work with this sweet felt star, and I really love how it turned out.

I started with a base of Bashful Blue, then I added a Quick Strip down the side. These were from SU! a year or two ago. For 2009, I am either going to use or get rid of some paper. I used to be a horrible hoarder!! I can tell you that all hoarding does for you is leave you with lots of outdated paper. Join me in using all your new and best stuff in 2009!!

Then I sprayed these two with some Caspian Sea Shimmer Mist. I made this by adding one jar of Radiant Pearls to four ounces of hair spray. It works like a charm!

I then put the sticker on BB card stock and cut the circle. The way I got it in there perfectly is by positioning the die exactly where I wanted it and taping it down. I cut the scalloped circle from Barely Banana and stuck it on the felt star.

Then I grabbed the metal stars with my tweezers and heated then dipped them one at a time into my retired SU! Light Blue embossing powder. I love to use ep this way, and that is why I have 40 or so colors. These stars look beautiful IRL!!

Do you ever get a card three quarters of the way finished and then decide you want the ribbon in an inaccessable place? That's what happened here, so I just took my SU! slit punch and punched a tiny nip out of the top of the card. Now the ribbon loops all the way from the inside to the outside of the card."

Thursday, April 16, 2009

Dawn's "Berry Best"

We have a gorgeous sample to share today, created by Dawn Lusk. She's something of a stamping celebrity as a member of the SplitCoastStampers Dirty Dozen DT. We're delighted that she gave us permission to share this with you.


The base of her creation is the Slash Folder with Tag #05, cut from Bazzill Smoothies cardstocks. See the darker blue portion? She embossed it with a Cuttlebug embossing folder before assembly. The little dots mimic blueberries. Creative genius, wouldn't you say?

The colors, sentiment and images all work so well together! Thank you, Dawn!

Wednesday, April 15, 2009

Candy Box Creations

We've got more guest designer goodies to share with you today... this time from Kitty Franken who does her crafting in the Netherlands. She decorated two Candy Boxes for us, and they're both very cute!


Her boy-themed candy box was cut from clear acetate and decorated with stickers and ribbons. She used similar stickers and ribbons for her girl-themed box, but that one was cut from solid cardstock.


It's so much fun to imagine all the possibilities with this versatile box shape. It'd make a wonderful party favor for candy-linked holidays like Easter, Halloween, and Christmas. Don't forget how pretty it would look all dressed up for a wedding favor or a little goody for baby shower guests.

Stay tuned for more terrific ideas!

Monday, April 13, 2009

Scrapping with Chipboard Die Cuts


Isn't this a gorgeous layout? It's the work of our April 2009 guest designer Irene Tan from Malaysia. She was kind enough to include instructions on how she created it!

1) Use a pattern paper as the base for this page. Distress it suing the scissors distressing technique and ink it with distress ink. Mat it onto a card stock.

2) Add a strip of pattern paper on the left of the page. Ink it's edges with distress ink first before attaching it to the page.

3) Use a clock masking template and some distress ink to mask the clock image on the upper left of the page. Later, sprinkle some water on it to get the water distressing effect.

4) Distress the edges of the photograph using the scissors distressing technique and use a sanding block to distress it's borders. Add it to the page.

5) Use another mask and some acrylic paint to mask on the upper left corner of the photograph.

6) Cut out another small strip of patterned paper and create ruffles with it. Place it vertically on the lower left of the photograph. Hand stitch a vertical line on the left of the page.

7) Treat some die-cut chipboard hardware (Photo Holder #01 and Photo Holder #02) and frames (Circle Scallop Frame and Nameplate #01) from Creative Cuts & More with the "Creating your Faux Metal Pieces" technique. Add the photo holders with some brads on the upper left and right of the photograph. Add the handle vertically with brads over the paper ruffles.

8) Print quote on vellum & attach it to the lower right of the photograph. Paste the Circle Scallop Frame over it and dress it up with some liquid pearls.


9) Add the negatives of some Prima felt flourishes on the bottom of the photograph. Ink it with distress ink and dress it up with Stickles. (Tip: try to recycle some of the negatives from your felt embellishment)

10) Add the "My Mom" title to the Nameplate and attach it to the page with brads.

11) Add some flowers randomly on the page and dress it up with some Stickles and liquid pearls.

Sources:
Die Cuts: Chipboard shapes from Creative Cuts and More (Circle Scallop Frame, Nameplate #01, Photo Holder #01, and Photo Holder #02)
Patterned Paper: Little Yellow Bicycle
Inks: Ranger Distress Ink
Others: Ranger Liquid Pearls, Ranger Stickles, Tim Holtz idea-ology Mask, Making Memories Acrylic Paint, vellum, brads, Helmar glue, Glue Dots and other adhesives.

This is a Mother's Day gift that she created for her mom. We're sure her mom will love it!

Sunday, April 12, 2009

Happy Easter!

Want to add a bit of elegant detail to your next card? Try Paper piercing! You don't need any special tools to do this, a push pin and a mouse pad will work just fine. To pierce the boarder on this card I printed a digital border stamp on plain paper and taped it to my card and poked holes every 1/8" or so. Then I poked a freehand design around the window.


I used the Circle Window A2 Card from Creative Cuts and More for the base. I used Digital stamps from Lindsay's Stamp Stuff and the vintage clip art is from Vintage Image Craft. I hope you have a lovely Easter spending time with friends and family, I know I will!

Wednesday, April 8, 2009

Apron Thank You Card


Here is a super easy card for those of you who love to give out Starbucks gift cards. The apron die cut has a flap that folds up creating a pocket, just big enough for a gift card and a small note if you like. Double Mates card stock was used here, which comes in a variety of colors. Each color has a dark and light side, great for cards where you see both sides of the card stock at once. This card would also make a great Father's Day gift. Just change up the colors and add a "home improvement store" gift card inside.

Thanks for looking!
Pam

Recipe:
CC&M "Apron Card": card stock color "Emerald Isle" Double Mates
Eyelets: Eye-Lets Etc.
Ribbon: unknown
Oval & Circle Punches: Stampin' UP!
Chipboard Letters: "Thickers" by American Crafts

Tip: Double Mates card stock works great for window cards too.

Sunday, April 5, 2009

Make a Spring Star Book!


Hello Folks! Today I want to share with you how easy it is to make a lovely spring decoration for your home using little more than some die-cut cards, stamps, cardstock, silk flowers and your sewing machine. If you ever wanted to make a star book before but were intimidated by the cutting and measuring, now is your chance because it is easy.


You will need 5 window card kits (green and blue parts) from Creative Cuts and More (Why not get 10 and make one for a friend too, you get a discount when you buy 10!), 5-8 1/2" x 5 1/2" sheets if cardstock (the red sheets), stamps small enough to fit inside the window card opening(About Art Accents), Killer Red tacky tape and stuff to embellish and hang your creation. I used ribbon yarn so I could add a lot of texture at a low price!


First center the window part of the card over the cut cardstock and stamp an image in the window (I embossed it with white EP) then place the back part of the card behind it making a sandwich with the center piece. Add a small piece of killer red tape to the middle edge of each layer of the sandwich and stitch around as shown. Avoid putting tape where the stitching will be. Make 5 of these signatures (Fancy word meaning a group of pages in a book).


Attach each signature together at the outer sides with killer red tacky tape. Punch holes on the inside layer fold and tie long ribbon yarn to hang it with. Use hot glue to add flowers and buttons to your creation.
Add more ribbon if you like.