Saturday, October 31, 2009

CREATIVE CUTS AND MORE CAARDVARKS HOLIDAY BLOG HOP

Hello Die Cut Lovers! It's coming TOMORROW! What you ask???

Tomorrow morning at 11 a.m. MT time we will be starting the Caardvarks & Creative Cuts and More blog hop! This Blog Hop is going to last THREE FUN filled days. You will be WOWED by all of the ideas and eye candy. There will be NO TRICKS and lots of treats!

We look forward to seeing you tomorrow!


Chrissy D

Yeah! It's Officially Halloween Today!

I wanted to share with you a great way to showcase die-cuts. I found this fun tree and thought it would be perfect for Halloween. Add some Creative Cuts & More die-cuts, gauze and sparkle and you have instant boo-factor!

Here are the die-cuts I used on the tree: Pumpkin Large and Small, Spider, Witch, Black Cat, and Tombstone. I mixed up the textures by using some acetate, Bazzill {with and without texture{, tacky tape and felt.

Some ways to accent them are: emboss them with your Cuttlebug, Glimmer Mists or Shimmerz, Doodlebug Glitter and Crushed Velvet, stamping on acetate and Stickles. I am sure there are more but this is what I did on this project.

Friday, October 30, 2009

Happy Halloween!

I can hardly believe Halloween is tomorrow! I used the witch and spider die cuts from Creative Cuts and More to make these "wicked spooky" cards.


I used the coffin box, acetate box, small pumpkin and larger flourish to make this (quick and easy) spooky set:


Have a safe and Happy Halloween!

Thursday, October 29, 2009

Season's Greetings House


I have been so inspired by the A2 Four Pane Window cards from Creative Cuts and More, I just couldn't resist trying to create a house with this. The four pane window card is die cut from Carob Cream Bazzill Smoothies cardstock, and I also asked for a snowman die cut (using Glass Slipper Bazzill Bling Cardstock). I have had such a great time being a Guest Designer for Creative Cuts and More this month.

You would not believe how easy and how fun it was to put this house together. For the roof, I punched out some small circles from an olive cardstock and glued them down on a triangle of cardstock. I wanted some snow on the roof, so I smooshed a white inkpad across the little circles. I added the sentiment with a little cluster of holly leaves and berries. The little red berries as well as the black buttons on the snowman are some cute little skittles that Creative Cuts and More sent to me with my order.

For the snow down on the ground, I tore some white cardstock, and applied stickles to the upper edge of each snow layer before gluing the layers together. The snowman's hat was colored with a black copic marker, and I dotted in the eyes and mouth with the marker.

Inside the window, I adhered a tree that I stamped and cut out of designer paper. I used a red designer paper that sort of looks like wallpaper behind the tree for a festive and Christmassy feel. The star is just freehandedly cut out with scissors and then covered with yellow stickles. The tree needed some ornaments, so I used some tiny little rhinestones so they look like little glass balls on the tree.

Why don't you go check out Creative Cuts and More to get started on your Christmas cards? They have all kinds of different die cut cards to inspire your creativity. I hope this Holiday House card has inspired you today. :-)

Wednesday, October 28, 2009

Cupcake Box

Creative Cuts and More~Cupcake Box


Honestly, I think I love Creative Cuts and More as much for the beautiful papers they offer as for all the cool dies! This Cupcake Box is cut out of Caramel Curious Metallic paper. If I was going to do a wedding or a bridal shower, these would be the colors! I started the box by stamping A Chemistry With Paper's branch stamp from Stylized Flowers in Brilliance Chocolate. I embossed it in Ranger's Hologram. I worked one side at a time, before I put the box together. Next, I glued on the Primas with SU!'s Crystal Effects-my favorite all-purpose glue. Then I put a dab of Crystal Stickles in the center of each flower and left it to dry for a few hours. I have learned to be very patient with Stickles, sometimes I think loose glitter is actually easier when you consider how long Stickles takes to dry! When I came back, I folded the box and fixed with CC&M's Killer Red Tape, and made the lid. Then I spent an embarrassing amount of time fiddling with the ribbon and making the bow out of Flourishes' fabulous brown satin ribbon, which I also attached with the redline tape.

Tuesday, October 27, 2009

I am addicted to mini albums! Yep, I need to join (or start) a support group. I can't stop making them! I absolutely LOVE ordering them from Creative Cuts & More and being able to get exactly what I want. Here is a 6x6 Mini Album set in chipboard and a 6x6 Mini Album Cover in acetate.

I LOVE using acetate covers and layering that front page, partly on the cover, and partly on the first page.


Wouldn't this mini album make a great Christmas gift to a new mom or to your childrens grandparents?
Papers are either Crate Paper or BoBunny. Embellies are from Doodlebug, Making Memories, K&Company, and some unknown brands from my stash!
Don't forget about our blog hops coming up! Caardvarks blog hop on Nov. 1st, 2nd and 3rd. Then our recipe blog hop on Nov. 9th and 10th!

Monday, October 26, 2009

Thanksgiving Banner & Blog Hop Info


I can't get enough of a good thing. These pennant and leaf die cuts are so fabulous! You get to choose your colors and textures, you can't beat that! I ordered two different die cut leaves in 5 different fabulous colors. I also had the Pennant die cut in cardstock and chipboard for stability.... longevity! I plan to use this every year. At the end of this post is a list of the colors I used... aren't they great together?

Be sure to join the fun with Creative Cuts & More and Caardvarks November 1, 2 and 3!


We will also be celebrating with a Recipe Blog Hop on November 9-10.
You don't want to miss this!

Supplies from Creative Cuts & More:
Pennant die cut from chipboard and Bazzill Canvas Cardstock Lakeshore #2
Maple Leaf #2 large die and small die
Oak Leaf die
Killer Red Tacky Tape
Bon-Bon Sugar Coating Glitter

All dies were cut in the following cardstocks:
Bazzill Canvas Cardstock: 
walnut-brown #3, java-brown #5, pomegrante #3, yam-orange #5, lakeshore #2

Pattern Papers:
Basic Grey Fruitcake - Tidings 
Basic Grey Blush - Romance 
Basic Grey Two Scoops - Blueberry Custard
Basic Grey Archaic - Rusty 
Basic Grey Archaic - Prehistoric

Saturday, October 24, 2009

From our Guest Designers

If you missed the OCTOBER BLOG HOP winner - scroll down two posts!


Well it's October, time to start thinking about Christmas! "What?" you say...Oh yes Christmas, if you are going to make something. And you are going to make something aren't you? I mean really who doesn't love a present from someone who cared enough to make something special just for them? Well we all get pretty busy around the holidays and I am no exception! As a matter of fact I have LOTS on my plate! (hmmm...that reminds of another layout I need to make.)But I digress...

Christmas beauties! I love when you give someone something and they say "Wow you made this?"(with exclamation!) You know whats nice about these? All you have to do is fold and decorate!!! No cutting or figuring out sizes, just the fun part- decorating! How could I resist these cute little die cuts from Creative Cuts and More! Inexpensive too- 75cents! Can't beat that! Here are some close ups...

A little take out box. I embossed it with my Cuttlebug, added some scraps, ribbon, flowers and a butterfly(broken piece of my daughters barrette.)


I embossed and inked this darling purse die cut. I am going to put a mini book in there. The flower was clear acrylic (also from Creative Cuts and More), I used alcohol inks to color it and glossy accents to make dew drops. I also used the alcohol inks on the rhinestones and pearls (Kaiser) to make them match. I used gold Stickles. The ribbon and metal piece were scraps I've had around.

How fun is this? This is a little tin and it comes with a mini accordion album but I cut it up to make these little cards! I thought it would make a cute gift set that you could throw in your purse- you know when you need a little card real quick...you can just pull one of these out of your purse. I also embossed a piece of packaging to cover the decorated tin. (I don't know about you but my purse gets messy!)


Here's what it looks like when you open the package.
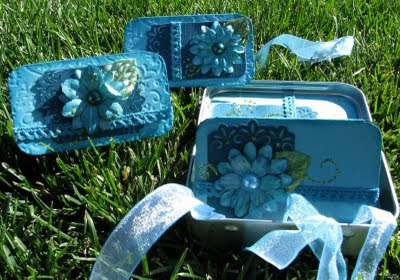
The cards...
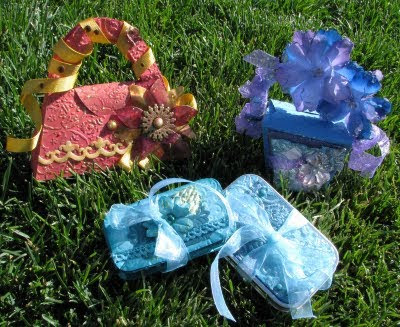

And one last look! I don't know about you but I love pretty things and I would be excited to receive something so cute! There are tons of different bags, purses die cuts to choose from. Use your imagination!


Rita Barakat

http://letsembellish.blogspot.com

OK - we were so blessed with such YUMMY Eye Candy from Rita, so here is some more delicious treasures from Tifany!

This little book is small enough to fit in your purse, but can easily hold all the lists to help you manage your gift shopping. And after you are done shopping, you can add a few album pages and turn it into a great holiday mini-album!

The velvet paper from Creative Cuts & More is a must for any of your Christmas projects...it is so soft and beautiful. It is also super easy to cut! The back of the paper has a surface that is very easy to trace onto to make your cutting easy

I love all the options for each of the great die cuts...you can get them in foam, acetate, many different papers and cardstocks, felt, polyshrink, different weights of chipboard, velvet, vellum...and even Tacky Tape! For the buckle I used a light weight chipboard cut and topped it with a metallic cardstock cut. The chipboard adds a nice depth to the buckle and the metallic cardstock was so easy to cover the chipboard with since it was already cut to the same shape.
{All the links to the supplies for this project from Creative Cuts & More are listed below.}

1 x Buckle #01 Set: Chipboard - Medium Weight
1 x Buckle #01 Set: Galvanized Silver
2 x 4"x4" Mini Album Cover: Black Chipboard - Heavy Weight {and 4"x4" Mini Album Pages, optional}
1 x Tomato Velvet Paper
1 x Alpine Velvet Paper

Tifany DeGough
http://www.inkblotsbytrd.blogspot.com/

Thanks for stopping by! Have a great day!

Antique Label

Creative Cuts and More!


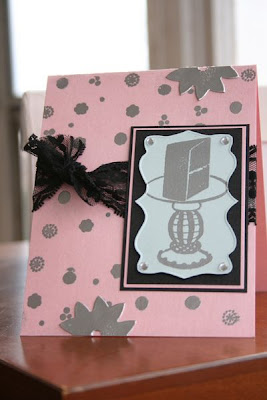
This was my very first project as a design team member for Creative Cuts and More. I posted it on my blog on February 26, 2008. CC&M is a die cut company. You go to the site, and choose from tons of dies, then decide what material you want it cut from. They also do custom cutting. You can send them your paper, and they will cut it for you. They carry LOTS of Bazzill, and these beautiful Stardream Metallics CS, like I used here. This is a DT sketch challenge card. I asked them to cut the lovely antique label in Aquamarine Stardream. I LOVE this label, and think I'm going to have it cut in about a million different colors! The flower was originally Coral, but I changed my mind about the color, so I dipped it into my VM pad and embossed it in silver-so no worry, no waste!

Stuff:
Stamps: Flourishes, Cake Decorating 101
Paper: ALL from CC&M, Aquamarine, Rose Quartz & Onyx Stardream
Ink: VM
Goodies: SU! detail silver EP, bling, lace, pop dots

OCTOBER BLOG HOP WINNER!!!!

We are so sorry for not posting this sooner! Time got away from us!

Congratulations to #13 -the True Random Generator picked you!


Scrapninny said...

I blogged about you today!
http://ensorcelledminds.blogspot.com/2009/10/die-cut-diva.html

Please contact Terry at custimerservice@creativecutsandmore.com with your address and shipment information and she will send you your prize!

Stay tuned for more FABULOUS Design Team Creations and MORE Blog Hops! Have a great weekend!

Thursday, October 22, 2009

Creative Cuts & More is Sponsoring the 2 Sketches 4 You SKETCH Challenge This Week

Good Afternoon Everyone. This week Creative Cuts & More is sponsoring the 2 Sketches for You Card Challenge.

Laura has designed this fun sketch that you can play along with- Sketch #37.

This week Creative Cuts & More is giving away the new Haunted House Castle Album Kit to the 'Card of the Week' winner!


and here is an example 
of this darling kit all put together...

Here's how to enter:
Go to the 2 Sketches 4 You Blog and provide a link to your card by posting it on this thread using Mr. Linky
• Deadline for all entries: Saturday at Midnight (US Mountain time)
• Your card should be based off the sketch provided and can be of any theme. You may enter as many times as you like and only need to do a card based on Laura's sketch to qualify for the prize.
• The winning card will be announced on the 2 Sketches 4 You Blog as the 'Card of the Week' on Sunday at 2 Sketches 4 You.
• International Cardmakers are welcome to enter

You do not need to use Creative Cuts & More products to enter the Challenge, but of course we would love to see what you could create using our products!!

To get your juices flowing here is what our Diecut Diva Steph Zerbe came up with.


For all the details on how Steph Zerbe designed her beautiful card for this sketch using our A2 Square Window Card and the coordinating the Straight Frame visit her blog- HERE.

Our Design Team will be uploading projects using the sketch through out the week. Today you can check out Lindsey Weirich's lovely interpretation of the Sketch by clicking here.

Snowflake Sleigh


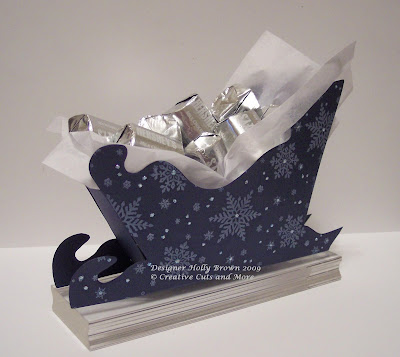
Here's another Christmas project for you today. :-) I used the Sleigh from Creative Cuts and More and stamped snowflakes all over it with a white craft ink. After the white ink dried, I dotted some of the snowflakes with some stickles glitter glue, and set it aside to dry. It was a snap to assemble this sleigh using the Killer Red Tacky Tape available from Creative Cuts and More. The hard part is deciding what to fill the sleigh with. I filled this one with some silver wrapped Hershey's Nuggets - mmmmmmmm. :-)

These would make great snack holders when you host Christmas in your home. Stamp and assemble four or five of these sleighs, fill them with little snacks or candies, and place these around your home. What guest wouldn't love to find a sleigh full of yummy snacks??

Wednesday, October 21, 2009

Distressed Santa box


Are you ready for Christmas yet? Here's an idea for a vintage Santa box for packaging up your gifts with. I used the Gable Box - Tall in a dark chocolate color and assembled it with the great Killer Red Tacky Tape.

I found this Santa stamp that I've had for years hiding in my studio. It was the perfect size for this box, so I inked it up with a dark brown ink, and then colored in just the face with a copic marker. The edges were sponged with more of the same dark brown ink, and then I used a distressing tool to rough up the edges of both the image and the white cardstock layer behind it.

This box needed just a little something more with a touch of color, so I used some holly leaves and some red dew drops in the corner on Santa's hat. This box will be a lovely way to present a gift to someone for Christmas this year. :-)

Tuesday, October 20, 2009

GIVING THANKS

Happy Fall! Today we had the perfect fall day in Wisconsin. It was wonderful. I was able to send the kids outside and get some cleaning done that doesn't always happen when they are there to mess it up.

I have two cards to share with you today and then some exciting upcoming news for November!


Diecuts: #4 Pumpkin Large - Smooth cardstock
No STAMPS!
Cardstock: Ruby Red, Chocolate Chip, Daisy D's Gypsy Harvest
Accessories: Prima Leaves, Paper Piercing Tool, Chocolate Taffeta, Buttons, Dimensionals


Stamps: Digi Images Wedding at Sweet 'n Sassy Stamps,
Cardstock: Vellum, Bazzill Bling cardstock available at CC&M
Accessories: Scallop Punch, Circle punch, Copics, Pearl Adhesive, Paper Piercing, mat Pack., organdy ribbon.


Creative Cuts & More is excited to have TWO upcoming events you will not want to miss! Check out the banners below and come back to see LOTS more eye candy!

Thank you for stopping by! Have a fabulous day!

Chrissy D

Monday, October 19, 2009

Monday Inspiration


Have you tried your hand at a window card yet?

I loved picking out 'wallpaper' for the outside of the card to make it look like you were looking out your country kitchen window. The 'siding' is made of shimmery paper I picked up years ago at a specialty scrapbook store. I was happy I waited for the perfect project. I think it's so cool. I rubbed ink along the edges of the 'siding' to make it stand out. And the stamping was fun too. I love coloring stamps in these days.... just ink and an Aqua Painter brush! I cut out a few of the elements to help give the card more character!

See you next week. Same place, same time!
Be sure to come by everyday for more inspiration and diecut projects!


Steph Zerbe

Thursday, October 15, 2009

OCTOBER BLOG HOP!

Hello Friends! Welcome to this months FABULOUS Thanksgiving and Christmas themed October Blog Hop! We're showing off projects that are perfect for the season. You will find a wide variety of projects to enjoy! Great gift giving ideas, ornaments and table decorations for your holiday spread.

Before we head off to the hop, we have a Christmas Shoe card designed by Design Team member Chris Dickinson from CC&M


Chris used an Exclusive Diecut for the Shoe card in Jupiter Stardream Metallic cardstock.


We also have some exciting news! Last month we debuted the BEAUTIFUL FALL KIT And guess what? We're offering up one of these kits for BLOG CANDY! If you have not seen samples, scroll down to enjoy more samples from this gorgeous kit!

This card kit is jam packed with supplies. This kit contains 12 die cut cards and envelopes. Many of the cards included in the kit are exclusive to CC&M. You will have everything you need to make 12 great cards. The only thing you will need to add is adhesive.
The kit is worth over $34 but we are offering
this kit in all of its Fall Glory for only $26.99!


Here are the five different ways to win our newest kit:
(A) Leave a comment on this post. (This is limited to one per person unless you meet the criteria of B, C, D and/or E below.)

(B) Leave one extra comment if you've posted a link to this blog candy on your own blog. Make sure to include a link to your specific post in your comment.

(C) Leave one extra comment if you become one of our blog followers. See the right-hand navigation column to follow us.

(D) Leave one extra comment if you click over to our page on Facebook and become a fan.

(E) Leave one extra comment if you invite your crafty Facebook friends to become a fan of our page on Facebook.
This prize drawing will be held at 11:59PM Mountain Time on Thursday, October 22. The winner will be posted shortly thereafter.

We've got some special savings for you! Save 15% at the Creative Cuts & More Store through October 22st by using the code Octbloghop1509 at checkout.

Our hop today starts with Holly Brown and she'll direct you to the next blog, and they'll direct you to the next blog, and so on. If for some reason a link is broken, don't panic. Just return here to the list and complete your journey.

Hoppin' Team Members:
Holly Brown - GUEST
Pam Smerker
Kayla Dupont
Rita Barakat - GUEST
Lindsay Weirich
Ellen Sosnoski
Chris Dickinson
Tifany DeGough - GUEST
Steph Zerbe
Angie Pearl

Happy Hopping & Happy Shopping!

Wednesday, October 14, 2009

Witches & Spiders Oh My!


October is my favorite month. Our front porch was Spooked Out before October even arrived!
Spiders are crawling out from the siding and are creeping along the sidewalk to the door. A creepy black cat guards the front as well as a couple of blood thirsty black crows. Cob webs have been stretched across every inch of the porch. All over the beautiful fall decorations, the old wooden rocking chairs and even the witches broom that hangs on the door.

But the inside of our house is sweet and calming. Just this fun little banner adorns the entry way. The challenge was simply to use this witch and spider die cuts. I couldn't resist making an October banner to showcase these fun die cuts from Creative Cuts & More.

This week Creative Cuts & More is sponsoring the Belli Challenge #76. Hop on over to play along!

Join us on Friday, right here at Diecut Diva, for our October Blog Hop!!