Showing posts with label Halloween. Show all posts

Tuesday, October 23, 2012

Halloween Sliding Pop Up

Today I created a simple Halloween card to share with you using the
Sliding Pop Up card from Creative Cuts and More


Closed view
I made this card horizontal and used a spiderweb embossing folder I found at Hobby Lobby
Inked it with Gumball green. (everyone that sees it thinks its inked with black!!)
And I used the fun new stamp set Googly Gouls from SU

Here is the open version. I kept trying to put more in the center but it was just best plain.
I sooooo wanted a haunted house in the background but I couldn't find one that I could get the card to close
My silhouette cuts were to bulky and I didn't have a stamp of a haunted house.
So I went with the "less is more" but I had to use all the little guys in the stamp set on this card.
Too bad wigglie eyes are not flat!!!

Hope you like it..
Have a great day,
Dianne

Thursday, October 11, 2012

Halloween Gable Box

Today I have a fun Halloween Gable Box to share with you.  
This would be fun to give to a friend full of Halloween candy!


I started by assembling a black Tall Gable Box die cut from Creative Cuts and More with killer white Tacky Tape.


I embossed a panel of Papaya core-dinations card stock with my Sizzix Pocket Watches embossing folder.  I used my Core-dinations sanding block to knock off the color on the raised parts.  Then I sponged on Black Soot Distress ink before adhering the papaya panel to the box.


I used Beacon Zip Dry paper glue to glue on Trick or Treat Color Fragments.
I stamped the Cling Halloween Magic image on a piece of smooth white cardstock and colored it with my Spectrum Noir Markers. 
 Hair: TN7-TN5-TN3-TN2
Dress: TN3-GB7-GB4-CT3-CT2
Greys: BG6-BG4-BG2
 Skin: TN2-TN1-EB1
and...I used some detail gold embossing powder on the watch and gear.

The fabulous ribbon is May Arts!

These Tall Gable Boxes are a terrific way to give candy, a gift card, or any small gift.  And they are so fun to decorate!

Thanks for stopping by!

Kristine


Thursday, September 6, 2012

Hallowee Sliding Pop Up Card

I have a fun card that I made with a Sliding Pop Up Card from Creative Cuts and More!

These cards look difficult but with the pre cut die from Creative Cuts and More they are really pretty easy to put together and all your friends will be so impressed!

I can't find the picture I took of it flat and ready to mail but here it is as you begin to pull on the ribbon and it slides open.

Here's How it looks from the front when it is open all the way.

The Cling Scared Cat Kiddo image from Stampendous comes just like you see the main image.  
 To create the border I stamped just the pumpkin part of the stamp with VersaMark ink and embossed with Paprika Embossing Powder from the Scenic Selection Embossing Kit.  then I added a little color to the pumpkins with my chalks.

The words are from the Happy Messages Clear Stamp Set by Stampendous and were embossed with Detail Black Embossing Powder.

There are lots of great 3D type card dies available at Creative Cuts and More.
They make you look like a pro with out all the stress!

Kristine

Monday, October 31, 2011

Happy Halloween Square Scallop Card

Happy Halloween!!!

Now that my kids are grown I don't get too in to Halloween and sorta hate the hassle of the trick or treater's because my dog just barks all night and the bugs fly in the house every time I open the door but I do still decorate my house and I love all the cute images available for stamping!

So in the spirit of the day I just had to share one last Halloween card with you!

I started with a 5 1/4" Square Scallop Card from Creative Cuts & More.  These are fabulous die cut cards to start any project with.  They come with the scallops all ready cut and the fold line scored.  


Here's a close up of the image.


Stamps:
Scarecrow and Jack by QKR Stampede
Paper:
5 1/4" Square Scallop Card from Creative Cuts & More
Cosmo Cricket patterned paper
Neenah white card stock
Ink:
Memento Tuxedo Black dye ink
Copic Markers
Other:
Large Brads
Martha Stewart Bakers Twine

I hope that you have a terrific Halloween however you celebrate!

Kristine

Monday, October 17, 2011

Halloween Treat Boxes

It's almost Halloween!

I thought I would share a couple of cute ideas for giving out goodies to those little special kids in your life.

Both of these boxes are die cuts from Creative Cuts & More.


This one is Matchbox #01 Large cut from Orange Bazzill Canvas Textured Cardstock.
I decorated it with stamps from The Rubber Cafe.


This box is the Coffin Box which I had cut from Black Neenah cardstock.
I embossed the images from The Rubber Cafe with white embossing powder.


Both of these would be a lot of fun to send in to your child's classroom for a Halloween treat!

They are quick and easy to make and go together easily with some Killer Tacky Tape.

I hope you liked my projects today!

Thanks for stopping by!

Kristine

Sunday, October 9, 2011

I Am Batty Over You!

I know I am not fond of REAL bats- but these paper and acetate bats from Creative Cuts and more really were fun to play with.
 I made a few designs usingacetate and black card stock BAT CARD. There are also a couple different sets available if you want to check out BAT CARD WITH FANGS or BAT CARD WITH FANGS AND EYES.
My first design was made with Black flocking- oh my that stuff is crazy-Have you worked with it? I would STRONGLY suggest using an embossing buddy if you are going to use acetate and flocking.
 My second project is a black cardstock and acetate bat put together- love how it stands up!
My third design is really my favorite. I used a sparkle silver card stock to accent the wings and make feet and Ears.
 I found a fun "recipe" on-line for Bat Wing Stew-The card is matted and slipped in the mouth.
 I added a little piece of velcro and attached a bow tied to hold the wings closed.
How about a view of the wings closed and the feet peeking out?
So, are you all done with your Halloween cards and crafts? Well, why don't you pop over and check out all the fun die cuts, cards, boxes available at Creative Cuts and More- it won't be spooky at all!

Tuesday, October 4, 2011

BLOOD DONORS NEEDED


Hello Friends! This is Chrissy D here sharing this ADORABLE Bat Die Cut!!! This die cut is PERFECT for your Halloween cards - or another idea.... Do you know someone who is a Phlebotomist??? How perfect would a birthday card be using this great BAT and a vampire sentiment??

Here are the details for my card...
This card is actually a fabulous die cut from Creative Cuts and More called the Bat Card with Fangs and Eyes. Isn't it SO cute?

Stamps: Mark's Finest Papers Boo To You
Cardstock: Layers from Mark's Finest Papers Groovin' Grape and White Storm and Licorice Whips
Accessories: White Gel Pen, Copic markers, Paper Snips, Rhinestones

Thank you for taking a look! Hope you have a wonderful day!!!
Chrissy D

Tuesday, November 23, 2010

To Sum Things Up...

Hi all!
Kim here today & I don't know where the time has gone this month!
As the Holidays wind up & the year is winding down,
I thought I would do a little re-cap of some of the projects I did this year with the
great dies from Creative Cuts & More...

Celebrations HERE...my Birthday creation is about halfway down...
 4th of July Freedom Mini-album HERE...
A Wedding Ensemble HERE, scroll down about halfway to see my creations...
Using Leftovers HERE...
 The Perfect Pair Hop with Clear & Simple Stamps HERE...
 Boo Bites HERE...
Halloween Mini Album HERE ...
Spooktacular Match Box HERE...
 Thanksgiving Place Cards HERE...
 Apron Recipe Card HERE...

Thanks for joining me on a trip down creative-memory lane!
I hope you all have a wonderful Holiday Season & I'll "see" you again soon!

designer: kim langhorst

Sunday, October 31, 2010

Happy Halloween!!

Happy Halloween, everyone! It's Darsie here, and I just love, love, love Halloween! There are so many fun ways to create with diecuts, and today I chose to make spooky candy boxes using the Coffin box diecut!


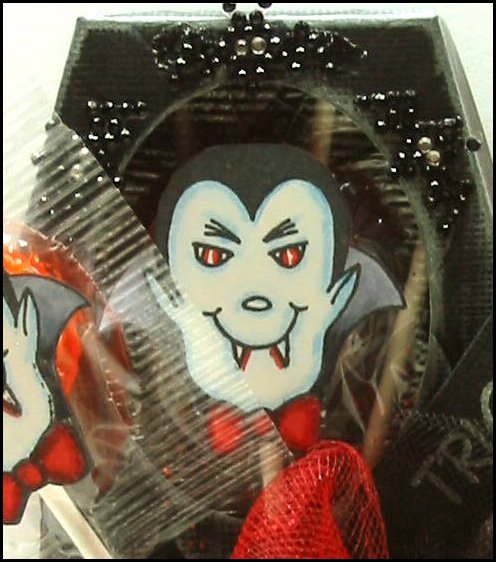
For this coffin candy box, I cut an oval out of the coffin lid, then embossed it with an embossing folder from Quickutz. I swiped Brilliance White ink over the entire coffin lid and base to give it that "aged stone" look. I accented the coffin with some sparkly red and black tulle, and an adorable Dracula image by Repeat Impressions which I glued to lollipops! I added a few rhinestone bats, and I was finished!


My next candy box was more on the simple side! I added the Small Spider diecut, which I had embossed with a Swiss Dots Folder. I also embossed the lid, same as above, and aged it with the Brilliance White ink. My spider web is from a Martha Stewart punch. I added a few rhinestones for eyes on the spider, a sticker for the sentiment, a big fluffy tulle bow and I was done!


Tuesday, October 26, 2010

Boo Bites!

Hi everyone!
Kim here again today to share a super simple Halloween Candy Bar Cover! A couple of years ago, someone gave me a "custom" wrapped candy bar & of course I thought to myself, "I can do that!" And so can you!!!

I simply covered the bar with some fun, spooky paper; added a Halloween border sticker along the bottom. Then I embossed the spider web onto the Petite Vintage Label, added the witch sticker a little saying! A perfect little treat for a teacher or a special neighborhood ghoul!!
Thanks for looking today!
Don't forget to check out the Creative Cuts & More website for 100's of dies for all your holiday projects!!
Designer: Kim Langhorst

Tuesday, October 19, 2010

Halloween Fun

Halloween is my FAVORITE time of year!
I love to get out all of my fall decorations & mix them up with a ton of little Halloween TREASURES, like this little mini-album I put together using the 4X4 ALBUM & TAB WRAP COVER in the Stardream Shimmer Metallics RUBY color (which is a very pretty purple-red!) with some fun stickers, stamps & quotes! I have several of these little books all over my house & I love to flip through them now & again!
Creative Cuts & More has so many fun mini-albums to choose from & a plethora of colors to create a fun little book like this! Hope you enjoy it too...


Thanks for looking!
Hope to you tomorrow for the big Autumn Blog Hop!!
Designer: Kim Langhorst

Monday, October 11, 2010

LYNN STEVENS - BOXES

Hello Everyone - This is Chris Dickinson here! I took the month of September off and it is taking me some time to get back into the swing of things here. September, we had the VERY talented Lynn Stevens as our Guest Designer, and I feel as if I failed her! I want to apologize to her for not having this posted last month.

Check out this HAUNTING project created by Lynn! WOW! Here are the details from Lynn...


What fun I had creating these treat boxes for Halloween. I used the coffin treat box for this. It is so easy to put together. The stamps are from the newest Artistic Outpost Haunted Halloween plate. I used the torn frames technique from the Technique Junkies Newsletter.


For my next project I used the Matchbox Large and spider die cut from Creative Cuts & More
The technique uses Worn Wallpaper from TJ latest newsletter.


Thank you for stopping by! Have a wonderful day!!!