Monday, February 28, 2011

Teacher Gift Card

I hope you are having a terrific weekend!

I have a fun teacher card to share with you today.

I started off with a "Gift Card Holder Square Card" from creative cuts and more. It all ready has the perfect size slits in the inside to hold a gift card. All you need to do it decorate the card!

Here's mine all decorated:


Here's the inside:


Stamps:
"School House Mouse" by High Hopes Stamps
Paper:
"Gift Card Holder Square Card" from Creative Cuts & More
Patterned Paper is from my stash
Ink:
Memento Tuxedo Black dye ink
Copic Markers
Other:
EK Success scallop border punch

Thanks for stopping by! Have a great week!

Kristine

Wild About You


Thanks for stopping by!

Today I have a fun card to share with you.

I started with a die cut "Standing Pop Up" card from Creative Cuts and More. I have made these from scratch before but this way is so much easier because all the pieces come pre-cut and scored which makes it fun and easy to make!

Stamps:
Paper:
"Standing Pop Up card" by Creative Cuts & More
Ink:
Memento Tuxedo Dye ink
Copic Markers
Other:
Dots & Dashes ribbon
Prima Mktg. flowers
K & Co. daisies
Spellbinders dies

Thanks for stopping by! I hope you have a terrific week!

Kristine

Saturday, February 26, 2011

Mowlene


"When it is 105 degrees in the shade, I don't care what the neighbors say."

Isn't Mowlene a hoot? LOL When I saw this stamp, I wanted to have a little scene with a window and some grass. I pulled out a Four Pane Window A2 Card and then I stamped Mowlene and colored her with Copic markers before cutting her out. I wanted to have some "grass" for her to mow, so I pulled out my scissors and just started cutting. I crimped some yellow paper and adhered it to the inside of this die cut window card so they look like mini blinds. The "stucco" look of the house comes from stamping Holly's Tattered Background on the card base.

Think of all the fun scenes you can make with this window card. I've made tons of different cards - snowy winter scenes, soft pastel springy scenes, warm fall scenes with leaves everywhere, and now a "scorching" summer scene. LOL What a versatile die cut card for any season! :-)

Die Cut: Four Pane Window A2 Card from Creative Cuts and More

Stamps: Mowlene & Holly's Tattered Background (I Brake for Stamps)
Ink: Aqua (Adirondack), Tuxedo Black Memento, Old Paper distress
CS: white, Garden Green
Other: butterfly punch, crimper, Martha Stewart fringe scissors, silver pearls, Copic markers

Friday, February 25, 2011

Life is not measured....

Hello!!  It's Noelle posting today and I love this File Folder A2 Card!!  It is so much fun to work with!!  I love that you can flip it too!  I'll do one like that soon!
I used one of my favorite {ippity} stamps from Love In Return. I really like the SU spiral punch, I thought it was great for a file folder card!  Yesterday at Hobby Lobby I saw a border one by EK!  The pink strip is paper ribbon by K & Co. It is like a sticker! I couldn't believe it when I peeled off the back every little cut out was so clean! The flowers are Prima and the brads are from my stash!
Thanks so much for stopping by today!

Thursday, February 24, 2011

Fin-tastic Pop Up!

EDIT: We totally spaced announcing the blog hop winner yesterday!

Debbie Yates said...

Wow...what a fantastic card! and a great hop!!!!

Debbie gets to pick a movement card assortment kit of her choice. Debbie, please contact us on the site with your choice of card assortments and your address.


And now....back to our card...

Today I have a fun "Sliding Pop up card" to share with you!

Here it is as you begin to pull the string to slide the fold up.

Here it is fully open.


and...a front view of it fully open!


You can measure, cut and score to make this card...or you can do what I did and start with a "Sliding Pop up card" from from Creative Cuts & More. Takes all the frustration out of creating because it comes all ready to stamp and put together!

This is a three piece die cut set.
You will receive the Sliding Pop-Up Mechanism, the card base and the pull-up piece.
This die cut has scored folds.

I ordered a white mechanism, Caribbean Breeze Card base and a white pull-up piece.

Stamps:
"Fishing for Details" by The Rubber Cafe
Paper:
"Sliding Pop up Card" from Creative Cuts & More
Ink:
Memento Tuxedo Black dye ink
copic Markers
Other:
Martha Stewart Bakers Twine
SU Eyelet
Spellbinder die

I hope you will give these a try...they are really fun!!!

Thanks for stopping by!

Kristine


Wednesday, February 23, 2011

A Swinging Card!

Dawn Lusk here, sharing this fun Twist Card from Creative Cuts and More. No guess work where to score, cut and fold! It's all done for you!!

Using Green at Heart Basic Grey, I cut strips to fit around the edges. then colored my digi image from Sassy Cheryl's with Copics and stamped several sentiments from Mark's Finest Papers.

I left the back blank so I can write a note. 


Thanks for stopping!!
Dawn

Tuesday, February 22, 2011

Dieting, Schmieting!!!

Hi all!
Becky here today to share a little project I made for my new work-out buddy! She's trying to lose a bunch of weight before a big speech she's giving in April & I thought this little bag of fun would make her smile!

I used the Large Square Bag #1 cut in Flinstone Bazzill Smoothies cardstock (swatch not up yet), adhered a vintage pin-up image to the front; added some fun yellow measuring tape twill around the box & handle & pinned a Small Tag to it.

Inside, I put an energy bar, some Crystal Light powders, a measuring tape & some "inspirational" cards to make her smile...
And, here's a glimpse at the little cards...they are just cards from the Becky Higgins 365 Project that I have never gotten around to doing, so I decided to use them elsewhere! But, you could easily create something similar by order a bunch of Rectangle #2 (2x3) cards from CC&M! I stamped some fun images & wrote messages on some of them too.


That's it! Don't forget to join us next month for our Blog Hop on the 16th!
Our team of talented designers is showcasing ALBUMS from Creative Cuts & More!
And, BOTH Kim & I will be working with the same album, the Mix & Match, that we split up & will each give it our own creative spin!
SEE YOU SOON!

Supplies:
Stamps: Glasses, birdcage, etc.- Michael's dollar bins; Vampy Women - Stamp Camp; others unknown (borrowed from mom!)
Cards: Becky Higgins 365 Project
Vintage image: online, Vintage Venus
Ranger inks

designer: becky voth

Saturday, February 19, 2011

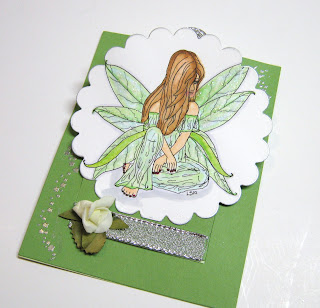
Fairy Slide Card Tutorial

Hello Everyone! Dawn here to share a tutorial I put together to show you how to make a sliding Pop Up Card.
I started with:
The card base measures 4-1/4" x 5-1/2".
The sliding pop-up mechanism measures: 4-1/4" x 5-1/2".
The pull up piece measures: 3-1/4" x 4-3/4".


I decided to use two shades of green . I also decided to emboss the words and designs with a silver embossing powder. I used a Crafter's Companion stamp set called Flower Fairies.


1.This first picture on the left is a view of the back side of the front of the card.
This is to show you the placement of the Killer White Tearable Tacky Tape 1/4 I used. Make sure you don't place on the top where the opening will be, it is easy to decide by the half circle tab!
2. The picture on the right shows the front of the mechanism- At this point I have attached the pull up piece to the bottom of the moving mechanism part.


3. The picture on the left shows another view of the sliding mechanism and pull up piece.
4. I checked myself several times before I pulled the tape strips to make sure the pull up piece would be correct but also that the sentiment I chose to use would show when the card was open.


5.Wanted to show you where I placed some more Killer White Tearable Tacky Tape 1/4 I used.
I wanted to make sure my image would stay where I place it and be able to withstand being opened and closed several times.
6. I used an old button from my stash and cut off the shank so it would lie flat. I actually used a piece of the
Killer White Tearable Tacky Tape 1/4 to hold the button also.


7. Laying flat to be mailed or put in an envelope- I have used an image from Lauretta Digital image Fairy.I have used rock candy clear glitter to decorate her wings.
She was colored with my Copic markers.


8.Side view showing the sentiment and the silver ribbon from Really Reasonable Ribbon and the flower from my stash. You can also see a view of the button I used as a pull.


The image was cut out with a Spellbinder shape and outlined with a silver pen to outline.
I sure hope you enjoyed my tutorial making a Sliding Pop Up Card this week.
This is another one of those cards that can be ordered in so many colors and used for any type card you might like to make.


Wednesday, February 16, 2011

Welcome to our February Blog Hop!!

This month is all about the Movement Cards!  They are so much fun to make!
We are so excited to tell you about our new Assortment Packs!  It is a great way to get a variety of cards to try!  They are all really fun to make!  
This one is the Twist Card
The stamps are by Unity, Bevy of Butterflies.  The gems are by Paper Studio.
Here is the list of Hoppers in case a link is broken.

Be sure to leave a comment on all the blogs!  Come back here telling us you did so and we will pick one lucky winner to receive a Movement Card Assortment of their choice!   We will pick a winner on Wednesday, February 23rd!  Good Luck 

Did you hear we now sell envelopes to go with your cards?

Thanks so much for hopping with us today!  We sure appreciate you coming by!

Monday, February 14, 2011

Spring Seeds

Happy Valentine's Day!!!

I have a fun project to share today but it's not a Valentine!

I just love this cute Square Bag by Creative Cuts & More!!!

You can order it in lots of different colors and decorate it for all kinds of occasions! I started with a white Square Bag and stamped and colored on it. It's the perfect size for giving a little gift of spring seeds. It holds 4-6 bags of seeds.

Stamps:
"Rain or Shine" by In Style Stamps
AmyR stamps "Spring Sentiments"
Paper:
Square Bag #01 Large by Creative Cuts & More
Prism Paper Cardstock
Ink:
Memento Tuxedo Black dye ink
copic Markers
Other:
Nestabilities by Spellbinder
Queen & Co. mini brad
Prima flower
Ofray Ribbon

This is a terrific, fun gift to give to teachers, friends, and family to help welcome Spring!

Thanks for stopping by!

Kristine

Sunday, February 13, 2011

Creative Cuts now has envelopes!!!

An envelope for all your cards!!  Click HERE to see them all!  They come in packages of 10!  They are a great deal!!  We carry A2, A6, A7 and 5-1/2" square envelopes. These envelopes will fit our die cut cards. 

Our Blog Hop is this Wednesday, the 16th!  We hope to see you there!  It's all about movement cards!  They are a lot of fun to make!

Saturday, February 12, 2011

Distress Colorblock Spring Milk Carton

Happy Saturday! It's Holly posting today, and I have a distressed, rustic, spring-themed milk carton to share with you.


I started with a Milk Carton die cut which was cut from white cardstock. I sponged Antique Linen distress ink all over the outside of the milk carton, emphasizing the score lines. Then I pulled out my Killer White Tear-able Tacky Tape and assembled the milk carton die cut (directions found here).

After I wrapped some hemp twine around the milk carton, I adhered some stamped collage rectangles onto each of the four sides. I added some buttons for a little extra color and texture. The top of the milk carton is not glued shut - I just wrapped some more hemp twine around the top and it will easily slide off when I want to put something inside.

Here is a close-up look at the collage image that I used:


I bet you've had enough of this freezing cold winter. Spring can't be too far behind. Enjoy your weekend!

Die Cut: Milk Carton
Stamps: I Brake for Stamps
Ink: Antique Linen distress, Marmalade distress, Marigold distress, Jet Black Stazon
Other: Killer White Tear-able Tacky Tape, buttons (Foo Fa La), hemp twine, linen thread, sponge

Wednesday, February 9, 2011

HEART SHAPED ALBUM


Hello All - this is Chris Dickinson sharing an album with you that I have been working on! (and...still working on!) This chipboard album comes from Creative Cuts and More and is called the Heart Shaped Window 6 x 6 Album


On this page, I used the Large Butterfly Background from Our Daily Bread Designs. 
From Creative Cuts and MoreI used the Petite Heart die cut in double sided adhesive and added Martha Stewart glitter to it!


Thank you for stopping by and taking a look! Have a wonderful day!

Tuesday, February 8, 2011

Happy Valentines Day!

    Hi Everybody!  It's Noelle posting today!  I whipped out these Valentines in no time, I LOVE this Heart Window A7 Scallop Card - Vertical
 I used a Heart #01-Large cut in Tacky Tape.  I  stuck it on and covered it in white glitter.  I embossed the sentiment from Inkadinkado!  The ribbon is from my stash!
                                              
  This one I used more ribbon from my stash and a Heart #02 - Small also cut in tacky tape!  I used more white glitter on it and outlined it in Stickles!  The stamp is by {ippity} from Life Is The Journey.

This one I had the Heart #01-Large cut in felt.  The little hearts are an {ippity} stamp from Life's Little Moments.  These cards are so quick and easy!   
Thanks for stopping by today! 

Monday, February 7, 2011

Happy Spring!

I know...it's no where near Spring yet...in fact as I type this many of you are still trying to dig your way out of the latest big storm. I am a little spoiled as I live in Southern California and it does feel like Spring here but I thought this bright spring themed card might help "warm you up" a little!

I used a Color Block A2 Mat for this fun card.

Stamps:
Tilly: Rain or Shine set by In Style Stamps
Paper:
Neenah white Card base
Prism colored card stock
Ink:
Memento Tuxedo Black dye ink
Copic Markers
Other:
Prima flowers
brads
Spellbinders dies

I hope this card brightened your day! Making it brightened mine!

Have a fabulous day!

Kristine

Saturday, February 5, 2011

Valentine Card to Share

Hello everyone- Dawn here in a New Year to share an easy quick card today.
Creative Cuts and More is all about Love and Valentine ideas this month. How perfect for me since we have been planning and attendingr our son and DIL's wedding this past month.

I started with the scalloped Heart Pop-Up Insert with Square Scallop 5-1/4" Card
I added Heart to Heart - Petite cut in tacky tape. I embossed with silver and attached to the card front.
Just had to add one more detail with the Scallop Oval Frame #01 - Large.
I have some wonderful embellishments I received from Judy at Pizzaz APlenty.


For the inside I used a CTMH stamp set- Soul Mates to emboss the pop up heart and the sentiment is from Cloud 9- Girl Thoughts.
The extra hearts our the negative shapes from the tacky tape on the front. I was thrilled to get two additional hearts to use in the inside.