Hi everyone! Becky here today.
I am repeating a post from our Christmas In July Blog Hop today because I have been laid up for over a week with a silly cold that is kicking my bum & I just haven't had the mindset to craft lately! I promise to have new something to share soon! But be sure to look around at previous posts & the July Hop for tons of ideas for your Holiday crafting!
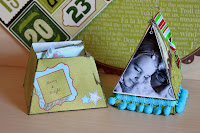
For this project, I decided to work with the Pyramid Box & the Pyramid Flat Top Box. I knew that I could layer these two to make a fun Christmas Tree with a hidden treasure inside!
After monkeying around with the image of my daughter in PSE, I cut various papers from Making Memories "Fa La La" collection & some fantastic BoBunny paper called "St. Nick in Toyland," into the triangle shape for the top of the tree. I used the fabulous Killer Red Tacky Tape in 1/4" to put the pyramid all together. Once that was done, I inked the edges of all the paper triangles with TH Walnut Stain Distress Ink before adhering the paper to the pyramid. I just love that pic of my daughter hugging Santa!!! (For those that live in the Denver Metro area, The Barn at Castle Rock has the greatest Santa, you can take your own photos & NO lines!!! All for FREE!!)
For the bottom, Flat Top Pyramid Box, I first used Olive Vine & Sunflower Glimmer Mist (I think I might be becoming a GM addict!) to get the same tone of green in the paper's I was using. I rubbed on a little image from Webster's Pages "Ting-a-Ling" collection on the front, a little "25" cut out from a piece of the MM "Fa La La" papers & glued it all together (including the lid to the top Pyramid) with more of the Killer Red Tacky Tape! Next, I used more of the Killer Tape to run that FABULOUS fiber across the top (also from Webster's)
Even though I wired the top & used a little ribbon from my stash, because of the hidden treasure inside, the tree is really too heavy to hang.
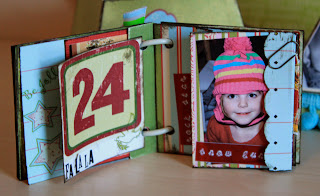
My little "treasure" inside, is just that...a little book of some favorite memories of Maggie during the 2009 holiday season! After printing a contact sheet (this is a great way to get tiny pix for these kinds of projects all at once!) in PSE of the photos I wanted to use, I cut all my papers from the Webster's Pages "Ting-a-Ling" & "Winter Wonderland" collections, as well as some more of that great BoBunny paper roughly into a 2x2 inch squares & whipped it out in no time!
Below are some more photos from the mini-album. I really tried to keep it simple, with the exception of a little accordion fold inside to allow for a few sequential photos. Like I mentioned above, I used mostly the Webster's papers, but threw in a few others from my stash. You'll see a couple of those great rub-ons again as well as tons of dymo labels! I LOVE my WRMK label maker with all the different font wheels (Dymo makes one now too)!!!
Be sure to check out Creative Cuts & More for all your Holiday projects!
!00's of new dies & more being added every day!
Thanks for looking!
See you soon!
!00's of new dies & more being added every day!
Thanks for looking!
See you soon!
Designer: Becky Voth


5 comments:
I could see this 100 times and still love it! SO CUTE!
I love your craft projects :) Very cute!
p/s: Dawn sent me <3
Oh my gosh! I have missed so much in the crafting world this last year! This is amazing, what a great project! Very creative!
ps. Dawn sent me
Love the projects!!! I'm a new follower! Dawn sent me over!
~Carol
cricutingcarol @ gmail.com
the little Christmas tree is super cute!! i love the album, too!
Post a Comment