Monday, August 27, 2012

Summer Dipped Strawberries

Today's card is using the Strawberry die from the new Cupcake kit.

Its an adorable die that is soon to be available individually at Creative Cuts and More!!! And I am in the process of making a fun kit you can buy to make these adorable dipped strawberries in a set with detailed instructions. They are the prefect size for a card or a tag hanging on a jar of preserves with a little to and from stamp on it. 


Hope you enjoy today's post,

Dianne


Saturday, August 25, 2012

keep swimming!

how's it going? ever feel like you are stuck in the muck and need to "just keep swimming" to get out?  this fishbowl window a2 card is awesome to use on a card for such an occasion!  the color of the base card is island breeze.  i used stamps from the {ippity} set, fishy philosophy and added some glitter as the rocks on the bottom of the bowl.
have a good weekend and hope you can spend some time getting crafty! 
angie

Friday, August 24, 2012

Halloween Flashback!

It's getting close to one of my favorite times of year! Fall and HALLOWEEN! Unfortunately, my computer crashed :( so I am hopping onto my husband's work computer real quick and sharing an older Halloween project I made, since I am currently unable to upload photos.

This one was used making the Slash Pocket with Tag #05.

Have you started working on any Spooky Projects yet?!!?!?!


Wednesday, August 22, 2012

Come on Baby!! Let's Do the TWIST!!

I *LOVE* the Twist A2 Card!!
I was recently over at Terry's house and she handed me a whole bag of things all cut in Kraft.  *SWOON*  For whatever reason anything in Kraft moves me to decorate it!
 
 The washi is MME Indie Pictures.  The Faith is from Unity's Painted Sentiments and the circles are from Unity's Just Circles.  The flowers are Recollections and the centers are 'skittles' the bling is Studio G.
 
The funny thing about my love for twist cards is I never mail them out.  I decorate both sides and then keep it in my card box.  There is no place to write so they never get mailed.  LOL  This time I just left it totally 'unfinished' so now I have a whole lot of room to write what I need to!  SCORE!!
Thanks so much for stopping by today!!


Monday, August 20, 2012

Mermaid Treat Bell Box

Today I have for you a Bell Box with the adorable Sugarplums Emma digital stamp sitting on her rock landscape with her little fishy friends.  I had this cut in Kraft for "Options" and when I needed a quick treat.

 I pulled it out and looked through my computer for the perfect August stamp set and this gift box came together. I filled it with Saltwater Taffy for the treat I needed but you could add anything (a  gift card would fit perfect in this box too). This box measures 3 inches at the bottom and narrows to 2 inches at the top and is 4 inches tall not including the tab.

I love having a few gift boxes on hand so when I need a gift I can just pull out the size I need, grab a stamp, complete the outside then grab the item I'm giving, toss it in and its done I have a sweet little gift package in a minute or two...

Items used:
Bell Box, Digital Stamps, Ribbon, Copic markers & Dazzling Details


Thursday, August 16, 2012

Birthday Tag Card

I don't know about you but I always seem to need birthday cards so I have been working on building up my stash.  For today's projectI used a pre-cut card, Slash Pocket with Tag from Creative Cuts and More for my card base.


All the stamps are from the Make a Wish Cooper set from Paper Pretties.

I colored the image with Spectrum Noir Markers.


Here's the inside of the card.


I hope you enjoyed today's card.  Check back soon for more fun Die Cut projects!

Kristine

Wednesday, August 15, 2012

Another Banner Album page! My FAV!!

I love this Banner album!
I REALLY love this darling baby!
Here is a close up and in case you are as nosy as me, you want to know what it says!
title: What we do all day long!
location: The chair in the l.r.
date: every day! all day!!
notes: 116 Days! Thank you for being the object of my obsession!! I LOVE You!
I added a bunch of bling in all the o's and under the picture. 


Thank you so much for stopping by today!

Monday, August 13, 2012

Cupcake Card

Today's fun card uses the cupcakes #02 set
Love this cupcake set and the many uses it offers.
For this card I used it in chipboard and then I covered it in solid and pattern papers.
Gives it just the right height for the card and make s the cupcake pop!


Used Sea life digital printed paper - mygraphico
Iridescent ice for sparkle
Bling, Ribbon and a flower punch

Saturday, August 11, 2012

miss you

hi there!  today i wanted to show you a gate fold card.  i love the idea behind this type of card because it's like a surprise is waiting even after you take the card out of the envelope!
i started with a gate fold a2 card in kraft.  then i stamped the friend definition on the band (color is ocean breeze).  added the miss you on the folded side.  then i took a piece of white cardstock, stamped the girl and colored with prismacolor markers.  finished with inking the edges to give a more subtle look for the sky and ground.  all stamps used are from unity and phylis harris (a unity co-brand).
have a good weekend and hope you can spend some time getting crafty! 
angie

Friday, August 10, 2012

Continuing With Christmas

So, Christmas in July got me on a roll with Christmas projects. I'll be thanking myself for this in December!
Today's project using the Peek-A-View Box embellished with the Cottage Cutz Elegant Reindeer Die. These boxes are the perfect size for a Christmas ornament or some yummy candies or home-baked goodies! Stock up now at Creative Cuts and More to get a jump start on your holiday crafting!


Thursday, August 9, 2012

I have a fun Pop up Card to share with you today!

I started with a die cut Standing Pop Up card from Creative Cuts and More.

The image and sentiment are Stampendous Impressions Stamps.

I used a little silver detail embossing powder on the trim to add a little sparkle.
Before assembling the card I ran the base through my cuttlebug in an embossing folder to add a little more interest.  Then I assembled the whole thing using Killer White Tacky Tape.

This is what it looks like when it's folded up and ready to go into an envelope.

Stamps: 
Forest Santa from Stampendous 
Tis the Season from Stampendous 
Paper:
 Standing Pop Up card from Creative Cuts and More
Ink:
Memento Tuxedo Black dye ink
Spectrum Noir Markers 
Other: 
Silver Embossing Powder
Cuttlebug embossing folder 

I hope you enjoyed my project today!

Kristine 


Monday, August 6, 2012

Cupcake Birthday Book

I made this fun book for a friends daughter to celebrate her 5th Birthday.

To make this album the way I did you will need:
1 Cupcake chipboard kit
1 frosting piece in chipboard (Solo piece coming soon)
6 Cupcake #02 set in chipboard 
Lots of bling and pattern and solid paper of your choice. 


The cover of this album has a cupcake topper in chipboard added (only on this page) and then card stock which I used Iridescent ice to sparkle. A flower in white with Iridescent Ice (lots of sparkle for Char!) Added Glossy Accents to the center of the flower for some pizzazz there as well.
The Happy Birthday letters are the Quickutz/Lifestyle crafts Olivia font and then I used the SU Dazzling Details to make it look like I had frosted them.
I did Debate placing them in the cupcake top area but they got visually lost and I know my Char likes pink so I left them in the cupcake bottom area. Easier to read.


Page 1 and 2
Some more info on this fun book.....
I used Echo Park's Little Girl digital (YEP!! digital!!!) printed paper for this album and SU Card stock.
They work so well with each other.
Tons of bling and lots of Iridescent Ice and Glossy Accents.
All patterns in the bling are freestyle.


Page 3 and 4
Love the mini cupcakes through out the book. It was so fun to mix and match the patterns in this set with the little cupcake tops.


Page 5 and 6
Note to everyone... Do Not Tip The Page You Just Put Glossy Accent On To Show Your Friends it will run
Had to fix the green dots on this page when I was so happy how they looked I wanted to show Melissa and I looked down to see the Glossy Accents running. Funniest part is we were face timing and I saw it on the screen it was like a bad movie... But it would have been great if they were Popsicles not cupcake sprinkles. So remember when using Glossy Accents do not show people your work by standing it up with pride until it is dry!


Page 7 and 8
Bling on the pink cupcake - I started the bling at the bottom of the cupcake and just was not happy so I went all the way around and fell in love. I know went a bit crazy with the bling. But I love it. followed that with the purple on page 6 as well and love that one too. As you can probably tell I did not work in order on this book.


Page 9 and 10
The pink topped one was the 1st page I did and I used those flowers and just had so much fun with them. its one of my favorite pages. 
The blue page I was so happy I had some left over gems from the sea life album they worked perfect here.


Back
Left this back cover blank as it will sit on a table or shelf and could mess up a picture.

Hope you all enjoyed this album
If you want to get one and try it out yourself check out CC&M
you'll love it! Very easy and fun to create.

I just love this new album we have in the store,
Loves,
Dianne


Saturday, August 4, 2012

earth laughs in flowers.

happy saturday!!   have you tried any of the cottage cutz dies yet? there were a ton of great examples during christmas in july!
i used the flowers 2, layered die on this card, along with a circle small window A2 card base.  using the dies is such a fun and simple way to add depth to your cards.  i stamped the base of the card with my favorite secret stamp, bubble wrap, and chalk ink.  simply ink it up and use as a stamp!  it's awesome! 
i added the sentiment from 'create your day' by  susan weckesser (a unity co-branded line) below the flower.  the flower is mounted on a white circle on the inside.

have a good weekend and hope you can spend some time getting crafty! 
angie

Thursday, August 2, 2012

Plumeria and Leaves

Hi All!

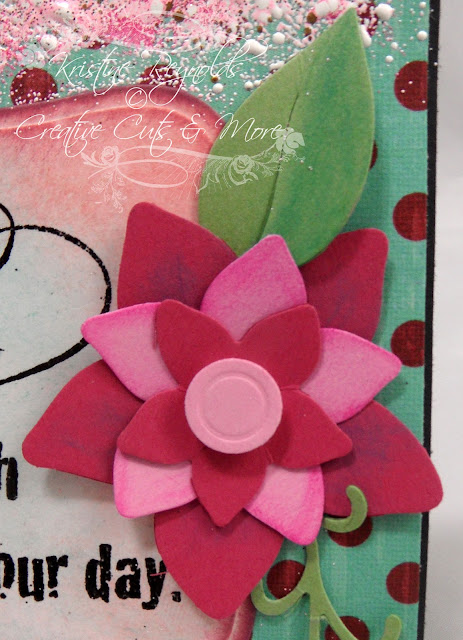
Welcome to the Die Cut Diva Blog!  Today I have a card to share that uses die cut Plumeria and Leaves by Cottage Cutz.


I stamped the sentiment Flower Path (from Stampendous)  on a white die cut panel and then sponged various inks on it to match the patterned paper.  The flowers Plumeria and Leaves by Cottage Cutz Die Cuts from Creative Cuts and More.
 

I sprinkled some Shabby Pink and Rubelite embossing powder on the card and heated it from the bottom until it melted. 
Here's a closer look at the Plumeria and Leaves.  I added a little chalk to it for some added definition.


 There are TONS of awesome Cottage Cutz dies available from Creative Cuts and more.  We will be showing you more in the weeks to come so be sure and check back soon!

Kristine