Showing posts with label Box. Show all posts

Friday, January 13, 2012

For That Special Friend…

Jan13 blk

Today I’m sharing this Square Window Square Box from Creative Cuts and More. Jan13 box

This is a 3 pc set, top, bottom, and acetate window. It comes pre-cut and scored, ready to decorate, fill and make someone happy!

Jan13 open

Jan13

Before taping together with Killer Tear-able Tape, I embossed the top with a pretty embossing folder. I added some flowers and some punched foliage. The sentiment and doily ‘frame’ are from Our Daily Bread designs that I cut by hand.

Be sure to check out Creative Cuts and More for those special gift giving needs… while you’re there, peek into the other categories too. Just be sure to have some time because you might just be a while! *wink*

thanks for stopping!

Dawn Lusk

Friday, November 4, 2011

Tuck Top Christmas Box!

Hi, Dawn Lusk here, with a quick and easy gift box! This is the Tuck Top Cube Box from Creative Cuts and More. Everything comes cut and scored...ready for fun!

I say quick and easy because all I did before putting it together was run it through with an embossing folder... there it only ONE seam that needs tape or glue! I used White Tear-able Tape. The bottom easily folds up and "flaps" together! What more could you ask for!!

I added an embossed band, stamped and embossed in gold, and a bow and pine bough. The image set is from Our Daily Bread designs.

Put your order in today for those Christmas or any other needs!!

Dawn

Thursday, August 11, 2011

Die Cut Boxes

Welcome back to the Die-Cut Diva Blog!!!

Have you checked out the die cut boxes that CC & M carries?  They have plenty of them just waiting for someone like you to turn into an amazing project.

Today I thought I would show you a few ideas to get your mojo going...

This first box was made with a Decorative Window Square Box 
What a fun way for a child to leave their lost tooth next to their bed for the tooth fairy.  And the tooth fairy can leave a little surprise back in the box.


I turned this Flower Window Box into a fun little "smores to go" pack.
This would be perfect to send to a child at camp or as a party favor at a "camping" themed party/sleepover.


and finally...here's a great little gift for a teacher who deserves lots of kisses!
I made it with an Apple Window Square Box.


All three of these boxes are held together with Killer Red Tacky Tape.  This is a fabulous double sided tape that really holds and works great for putting these boxes together and keeping them that way!

I hope you gained some inspiration from these projects!

Stop by again soon to see some more fabulous projects by our design team!

Kristine

Sunday, December 19, 2010

Awareness Ribbon Gifts by Dawn

Hello Everyone Dawn here again,
I am back today with a few more gifts I made from Creative Cuts and More products.
Some of the products I received from Terry at CC&M after winning a blog hop are part of this post and in today's.
These are the gifts I included with the package with the album I took to the cancer center to donate.


Awareness Ribbon A7 Scallop Card - Horizontal is the base I started with here.
I used the stamp set from Clear Arts to decorate and also the Ek Success border punch. The paper I used in the window is from CTMH.


Awareness Ribbon Window Square Box #01 in pink here was so easy to decorate.

I used the aggressive Killer White Tear-able Tacky Tape - 1/4" on the backside of the box to cover the ribbon, then just added a little rock crystal glitter. The stretch pink ribbon, small flowers and pearls are from Hobby Lobby.

Thanks for stopping by today until next time- take care!

Sunday, October 31, 2010

Happy Halloween!!

Happy Halloween, everyone! It's Darsie here, and I just love, love, love Halloween! There are so many fun ways to create with diecuts, and today I chose to make spooky candy boxes using the Coffin box diecut!


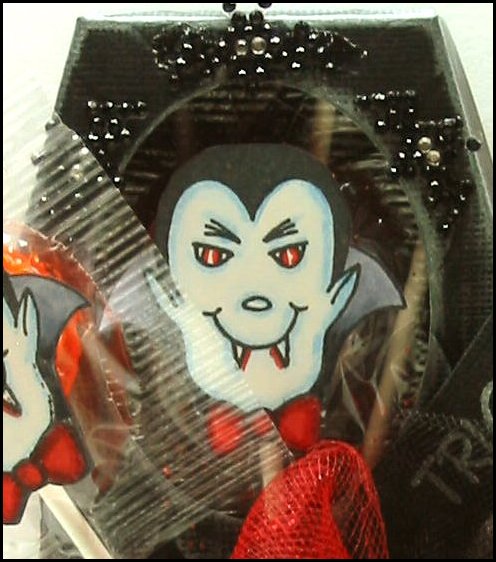
For this coffin candy box, I cut an oval out of the coffin lid, then embossed it with an embossing folder from Quickutz. I swiped Brilliance White ink over the entire coffin lid and base to give it that "aged stone" look. I accented the coffin with some sparkly red and black tulle, and an adorable Dracula image by Repeat Impressions which I glued to lollipops! I added a few rhinestone bats, and I was finished!


My next candy box was more on the simple side! I added the Small Spider diecut, which I had embossed with a Swiss Dots Folder. I also embossed the lid, same as above, and aged it with the Brilliance White ink. My spider web is from a Martha Stewart punch. I added a few rhinestones for eyes on the spider, a sticker for the sentiment, a big fluffy tulle bow and I was done!


Monday, October 11, 2010

LYNN STEVENS - BOXES

Hello Everyone - This is Chris Dickinson here! I took the month of September off and it is taking me some time to get back into the swing of things here. September, we had the VERY talented Lynn Stevens as our Guest Designer, and I feel as if I failed her! I want to apologize to her for not having this posted last month.

Check out this HAUNTING project created by Lynn! WOW! Here are the details from Lynn...


What fun I had creating these treat boxes for Halloween. I used the coffin treat box for this. It is so easy to put together. The stamps are from the newest Artistic Outpost Haunted Halloween plate. I used the torn frames technique from the Technique Junkies Newsletter.


For my next project I used the Matchbox Large and spider die cut from Creative Cuts & More
The technique uses Worn Wallpaper from TJ latest newsletter.


Thank you for stopping by! Have a wonderful day!!!


Friday, September 3, 2010

Steph Zerbe here.
Halloween is near.... I just had to decorate the Coffin Box again this year. I decorated some last year too, see all of our Coffin Box posts HERE. It's so easy to assemble and a ton of fun to decorate.


I used Waltzingmouse's Midnight Feast set along with their Vintage Circle set. I paired them up with a single pumpkin from Clear & Simple Stamps Pumpkin Patch set. Love them all!


Thanks for stopping by!

Tuesday, July 27, 2010

Shabby Chic Treasure Box

Hi! Becky here to share a little treasure box I made from the Pyramid Flat Top Box in a smooth cream cardstock...

I am a huge fan of the "Shabby Chic" look & wish so desperately that my home was decorated in this wonderful style! So much so, I collect pictures from magazines & websites for future decorating ideas!
(back side)
(one of the sides)
Once I traced the trapazious sides of the box with the papers I wanted to use, I used Killer Red Tacky Tape in 1/4" to adhere the paper onto the box & then again to put the box together.

I then inked the edges of all the sides/papers with ink using Tim Holtz's Ink Applicator (the little thingy that holds felt squares?) to give it a softer aged look. Then I went over two of the sides entirely with the Rock Candy Distress Crackle Paint & only the edges of the opposite 2 sides. After that was dry, I lightly inked again & then decided to add a little of the Antique Brass Distress Crackle Paint to the bottom edges & corners.
(the crackle paint)
 
(tiny banner)
I made the little banner from scraps of paper, inked them, stamped "Shabby Dreams," punched tiny holes & threaded the jute through. I then attached it to the lid punching holes again in the corners of the lip of the lid & threading the jute through & tying a knot. At the last minute I added more of the Antique Brass paint to the banner as well.

Finally, I cut a bunch of flowers from the TH die, inked them all, then applied either the Rock Candy paint to an entire flower or the Antique Brass to just the edges of some. Punched holes in the centers, did the same on the lid & attached it all with an antique brass brad from my stash.

Now I have this wonderful little treasure box where I can put little ideas & trinkets - like broken vintage watch faces, a thimble, an old photo, a piece of lace - whatever makes me think of shabby designs! When the time comes, I will open it for my decorating inspiration!!

The other supplies I used were:
Patterned papers by Shabby Green Door from the "On the Wings of a Dream" collection
Tim Holtz products:
  Walnut Stain Distress Ink
  Rock Candy & Antique Brass Distress Crackle Paints
  Tattered Florals die cut
Making Memories magnets letter stamps
ColorBox Pink pastel chalk ink
Jute
A brad

Thanks for looking!!!

Wednesday, June 16, 2010

Just for Dad

Hi, Lisa here today, and my project is for the men in your life! I used the Creel Box Die Cut in Chocolatey Chip, for a cute Gift Card Holder. This box is a snap to assemble, decorate your panels, then add some Killer Red Tacky Tape and adhere your end together, easy peasy!

Instead of decorating the box with pattern paper, I stamped my image on Matte Card stock, then used the Pulled Glimmers Technique from the current TJNL to add color to the background. I went back and added additional colors with an H20 Brush and Distress Inks. Then cut my panel to fit the front of the Die Cut.

Details:
Stamps - Cornish Heritage Farms
Ink - Black, Distress Inks
Card Stock - Creative Cuts and more Creel Box Die Cut, Matte White
Other - Glimmer Mist, H20 Brush
Designer Lisa Somerville

Monday, March 1, 2010

BIRDY BOX


Hello Everyone-
I am hoping this finds you all doing FABULOUS! The project I am bringing you today is the ACETATE BOX! I love these little boxes! They are perfect for those small gifts for your friends or loved ones! Terry has so many different boxes to choose from too! Check out her choices HERE

Here are a few more details:
Stamp Set: Our Daily Bread Designs - He is my Refuge
Cardstock: Wassail Dp, Acetate - Box with a Handle from Creative Cuts and More, green Co'ordinations
Accessories: Copics, Gems, Nestibilities, Big Shot, Dimensionals, MS Branch punches, Air brushing, Black pen, Poly Twill ribbon from SU

Thanks so much for stopping by! Have a wonderful day!
Chrissy D

Friday, February 19, 2010

Crayon Box

This is a simple diecut Crayon Box
made into a beautiful Thank You gift box.

I stamped a nice, cream colored piece of cardstock with polka dots and a sentiment then attached it to the bottom half of the craft colored diecut Crayon Box before I assembled it. I embellished the front with a stamped flower, ribbon, buttons and gems.
Too easy!

It only needs one strip of Killer Red Tacky Tape along one edge (see flat blue box below) and then the bottom folds into itself.... just like the crayon box you had in elementary school.

Visit Creative Cuts & More to see our HUGE assortment of diecut boxes, bags, embellies, cardstock and so much more!

Here are a few diecuts that
I will be working on in March.
Click on the photos for more information!!
Box with Handle - Click Image to CloseKeepsake Box - Click Image to CloseBaby Shoe - Click Image to Close

Friday, February 5, 2010

Acetate Puff Box

Hey bloggers, Steph Zerbe here.

Today's featured die cut is the
Puff Box - Short cut from acetate.

The Puff Box is real easy to assemble.
I just used one strip of 1/4 in. Killer Red Tacky Tape.

Then I used another strip of tacky tape to adhere the lace trim. Added a few flowers with glue dots and filled it with buttons. A crafty friend's dream gift!!!

I punched a half circle with a 1-1/4 inch punch
to make it easier to get to the assorted buttons.

Many boxes and shapes can be cut from acetate.

Here are a few of my favs:
...............................................................................
Stop by Monday,
February 8th for our
February BLOG HOP

Tuesday, January 26, 2010

Button Heart Box


I ordered the Heart Pocket Box from Creative Cuts and More in this gorgeous metallic cardstock called Jupiter Stardream. Can you see the shimmer in this photo?

I didn't want to cover it up too much, so I stamped the sentiment on white cardstock and cut it out with a heart shaped die. Then I poured out a container of buttons and just arranged to my heart's content. This Heart Pocket Box comes with holes punched out at the top, so all I had to do was assemble the box (using Killer Red Tacky Tape) and tie some ribbon through the holes.

Now can't you just see yourself making these in all different kinds of colors? You could order a pink box and use red buttons, or you go non-traditional and order a purple box and decorate with yellow buttons. Wouldn't that be fun? Go check out the fun die cuts over at Creative Cuts and More today and let your creativity go wild. :-)

Friday, October 30, 2009

Happy Halloween!

I can hardly believe Halloween is tomorrow! I used the witch and spider die cuts from Creative Cuts and More to make these "wicked spooky" cards.


I used the coffin box, acetate box, small pumpkin and larger flourish to make this (quick and easy) spooky set:


Have a safe and Happy Halloween!

Wednesday, September 23, 2009

Catch Of My Life

When I received the Creel Box, I instantly wanted to do something fun for my husband. I pulled out one of my favorite lines (Mr. Campy from Cosmo Cricket) and started decorating the box. The fishing pole and fish came from a paper scrap I had. This is what I ended up with:


What is a fishing box without fish? I added some of my husband's favorite candy, Swedish Fish, and delivered it to my husband at his office!


I think this makes such a great gift for any man in your life!

Sunday, September 13, 2009

Super September Hop

Welcome to our amazing Autumn & Halloween September Blog Hop! We're showing off projects that are perfect for the season.

Before we head off to the hop, we have a few cute photos to show you. Design Team member Kat Salmon created this spooky Haunted House using the Bare Elements Reyna Castle Book from CC&M.


Kat also created this wonderful bowl of Halloween goodies using our die cuts. She used the exclusive Coffin Box, the Oval Window Box and the Short Puff Box. We think these couldn't be any cuter!


And now for some exciting news! We've got a terrifically terrifying new Haunted House Castle Album kit to debut. And guess what? We're offering up one of these kits for BLOG CANDY! DT member Pam Smerker really outdid herself with this one, wouldn't you say? This kit features the Bare Elements Reyna Castle Book plus die cuts and Diva Dots from CC&M and papers & embellishments from Doodlebug. Here's the eye candy:


Now that you've seen the samples, here's the kit. You can get all this Halloween goodness for only $19.99.


Isn't that Haunted House adorable? Here are the five different ways to win our newest kit:
(A) Leave a comment on this post. (This is limited to one per person unless you meet the criteria of B, C, D and/or E below.) Tell us all about the little gifts you'll be making this year for neighbors, co-workers, and teachers.

(B) Leave one extra comment if you've posted a link to this blog candy on your own blog. Make sure to include a link to your specific post in your comment.

(C) Leave one extra comment if you become one of our blog followers. See the right-hand navigation column to follow us.

(D) Leave one extra comment if you click over to our page on Facebook and become a fan.

(E) Leave one extra comment if you invite your crafty Facebook friends to become a fan of our page on Facebook.
This prize drawing will be held at 11:59PM Mountain Time on Friday, September 18th. The winner will be posted shortly thereafter.

We've got some special savings for you! Save 15% at the Creative Cuts & More Store through September 21st by using the code fallbloghop0909 at checkout.

Our hop today starts with Angie and she'll direct you to the next blog, and they'll direct you to the next blog, and so on. If for some reason a link is broken, don't panic. Just return here to the list and complete your journey.

Hoppin' Team Members:
Angie Pearl
Melinda Ford, Guest
Carla Mayfield
Kayla Dupont, Guest
Diana Stout, Guest
Chrissy Dickinson
Ellen Sosnowski, Guest
Stephany Zerbe
Lindsay Weirich
Jennifer Johnson
Kim Ross
Pam Smerker

Happy Hopping & Happy Shopping!