Showing posts with label Christmas. Show all posts

Thursday, December 20, 2012

What a Cracker!

Today I made some cute little cracker Candy Boxes to match this cute image on this card.

Cracker Candy Boxes by Creative Cuts and More are a fun way to give a little gift.
You can fill them up with candy or money or whatever else you can fit in them.
The Candy Boxes come die cut with the folding lines all pre-scored.
I covered these with patterned paper and then put them together with Killer white Tacky Tape. 
I tied matching ribbon around the ends.

This adorable image is from Strawberry Kisses-"What a Cracker" from Crafter's Companion.


Thanks for stopping by Today!

Kristine

Thursday, December 6, 2012

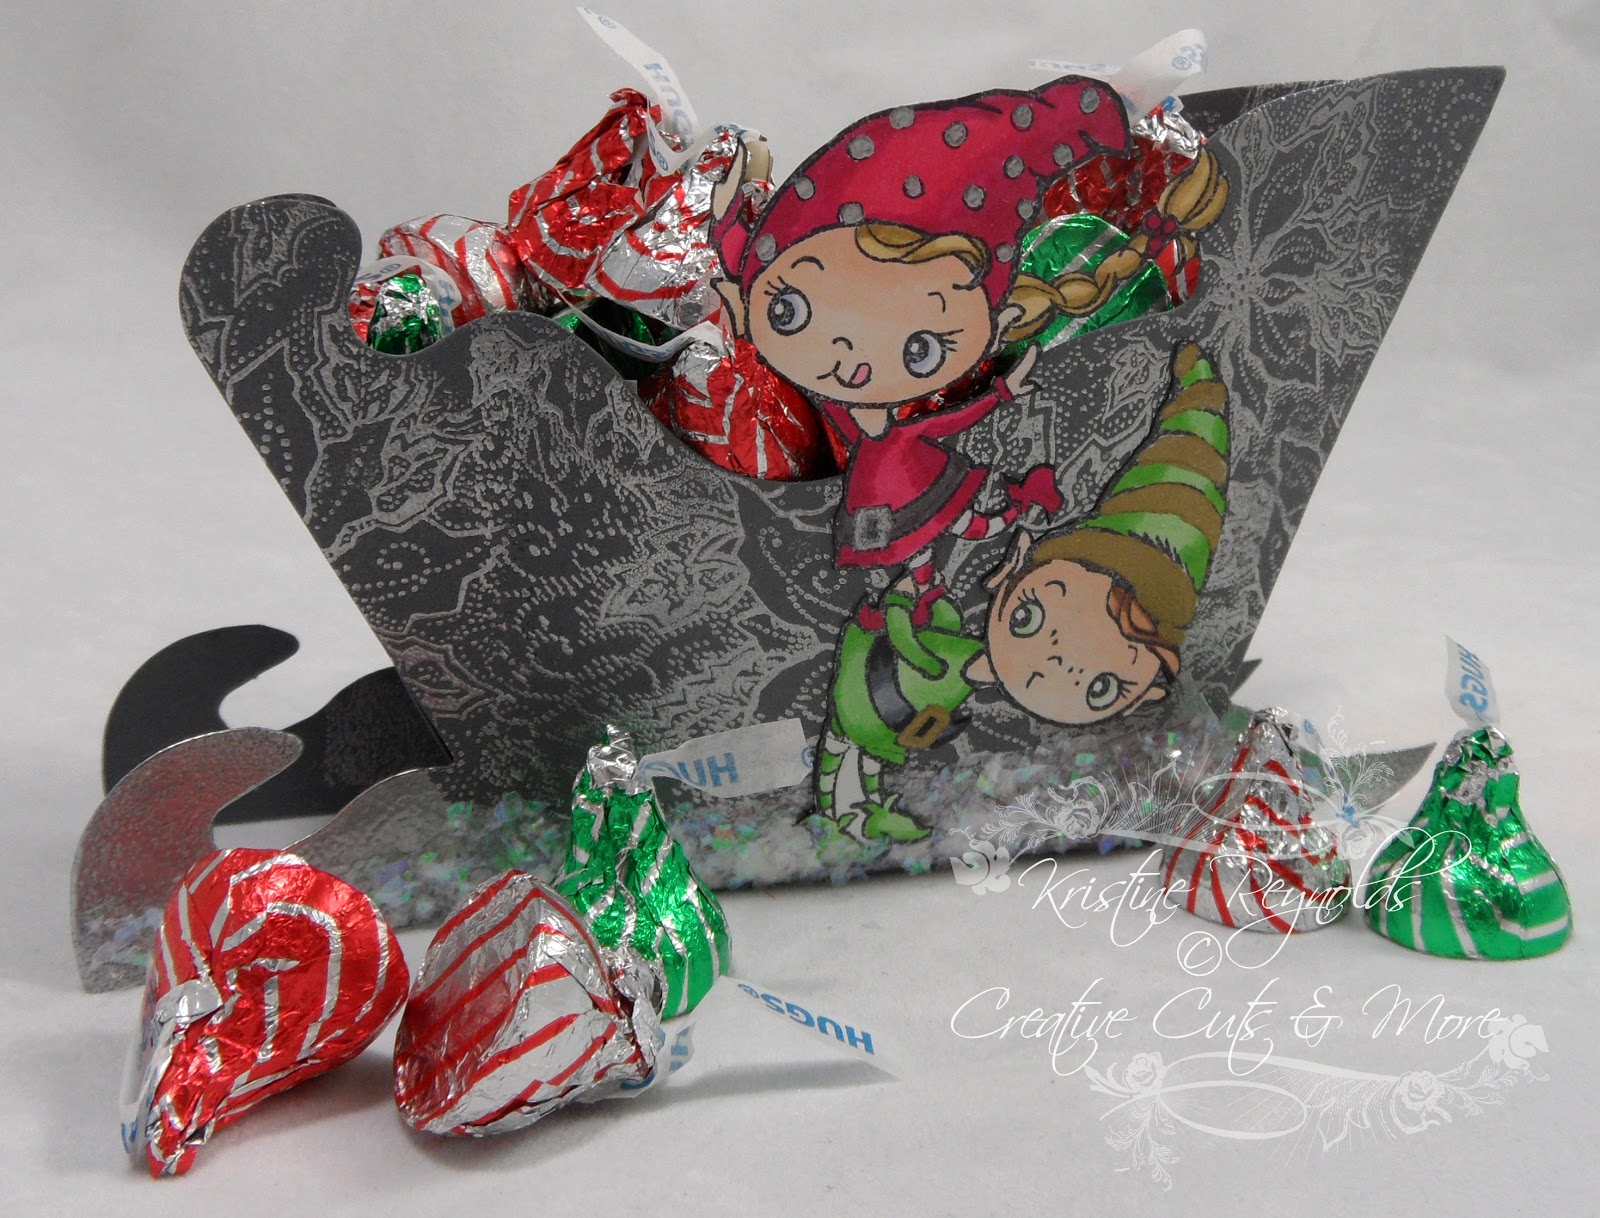
Candy Sleigh

Welcome to the Die Cut Divas Blog!
Today I have a fun Die Cut Sleigh to share with you!

 I started with a die cut 3D Sleigh from Creative Cuts and More cut out of Bazzill Date Swirl cardstock.  I stamped the entire sleigh with Poinsettia Background using VersaMark ink and then I heat embossed with Detail Silver Embossing Powder.
I covered the "blades" with VersaMark ink and embossed them with silver EP too.

The sleigh was put together with killer white Tacky Tape.

I colored Tree Trim Kiddos with Spectrum Noir Markers and then fussy cut the Kiddos out and adhered them to the sleigh.

  I adhered Shaved Ice fragments by Stampendous to the bottom of the sleight to create "snow".

Then I filled it up with candies.  This would look great on your table or would make a fun gift!

  
I hope you enjoyed my project today!

Have a great rest of your day!  

Kristine 

Tuesday, December 4, 2012

Candy Cane Peek-A-View Box

I made this for this weeks Cornish Heritage Farms Challenge to make a Christmas Box or Bag and thought I'd post it over here for our followers too!

Here is the box I made:


I started with a Peek a View Die Cut box from Creative Cuts and More.

I stamped the top and bottom portions with Large Dots Backgrounder from CHF.
Then I punched a strip of red cardstock for the bottom of the box and cut a thin strip of the same cardstock to go around the top portion.


The "sign" stamp is from the Winter Vintage Sign Set from CHF.
I stamped it in red ink and sponged more red ink around the edges.  Then I backed it with a couple of die cut scallop edged panels.

This box would be a great way to display mini candycanes for little visitors to eat or a fun gift for a teacher or friend!


Thanks for stopping by!

Kristine

Thursday, November 15, 2012

Christmas Tag Card

Today I have a fun Christmas Tag Card to share with you.

I started with a die cut Slash Pocket with Tag from Creative Cuts and More. 

I stamped this image from Mulberry Wood-Wish Upon a Star. on a white panel in black Memento Ink and colored it with Spectrum Noir Markers.

Then I trimmed the panel down to fit the front of the card. 


I left the tag blank so I could write on it.


I love this die cut Slash Pocket with Tag from Creative Cuts and More because it allows you to make a unique card that looks like it took a lot of time.  You can find more die cut tag cards HERE.

Thanks for stopping by!

Kristine

Thursday, November 8, 2012

Christmas Coasters

Kristine here today and I am very excited to share some fun coasters I made with  
Chip Board Coasters from Creative Cuts and More
Stampendous Stamps, and Beacon Fast Finish Decoupage.


The Chip Board Coasters come in packages of ten.


To make these I started by sponging Ranger Old Paper Distress ink on each of the coasters.


I stamped Music Score background (Stampendous) two times with Memento Tuxedo Black dye ink on tissue paper.

I tore the tissue into four pieces and adhered it to the coasters with Beacon Fast Finish Decoupage. 


For this one I stamped Holly Basket (Stampendous) on tissue and colored it with Prisma Color Pencils.
Then I adhered it to the coaster with Beacon Fast Finish Decoupage.

When it was dry (which happened very quickly) I stamped the flourish from Jumbo Cling Poinsettia (Available at Michael's) on the edge with VersaMark ink and heat embossed with Aged Silver Embossing Enamel.


I used Jumbo Vintage Santa  for this coaster.
I stamped santa on tissue and colored him with Prisma Pencils.  Then I adhered him to the coaster with Fast Finish Decoupage.  I stamped the banner with Memento Cottage Ivy dye ink on tissue and then added it to the coaster with Fast Finish Decoupage.

When dry I stamped Scrolled Medallion with VersaMark ink and heat embossed with Shabby White Embossing Enamel.  I also used my VersaMarker to add ink to his hat and embossed with the Shabby White EE here too!.


For the third Coaster I used Jumbo Cling Poinsettia (Available at Michael's). I stamped the poinsettia on tissue paper and colored with Prisma Pencils before adhering it to the coaster with Fast Finish Decoupage.
When dry, I stamped the flourish from the Jumbo Peony Set (Stampendous) with VersaMark ink and heat embossed with Aged Gold Embossing Enamel.


 For the final Coaster I used Stampendous Snow Bird.  I stamped it on tissue and colored with pencils and then adhered it to the coaster with Beacon Fast Finish Decoupage.

When dry, I sprinkled Shabby White Embossing Enamel  randomly on the edges of the coaster and heated until it melted.

These coasters are quick and easy to make and make terrific gifts!
I hope you enjoyed my project today!

Kristine

Thursday, September 20, 2012

Santa Gatefold Card

Today I have a fun Gate fold Christmas Card that I made with a die cut Gate Fold Crescent A2 Card with Band from Creative Cuts and More.

Here it is all closed up and ready for mailing.
That fabulous Santa is a Jumbo Cling  stamp from Stampendous that I colored with Spectrum Noir Markers. 
I can't find Santa in the store right now...I think he's out of stock but he'll back soon!
I stamped the background with Cling Jumbo Snowflakes and embossed with Winter Wonderland embossing powder.


Here's how it looks when you take the band off and open it up.
The inside sentiment is from "Tis the Season clear stamps.


You can order these great dye cut cards in tons of different color combinations.
Check them all out here.

Kristine

Friday, August 10, 2012

Continuing With Christmas

So, Christmas in July got me on a roll with Christmas projects. I'll be thanking myself for this in December!
Today's project using the Peek-A-View Box embellished with the Cottage Cutz Elegant Reindeer Die. These boxes are the perfect size for a Christmas ornament or some yummy candies or home-baked goodies! Stock up now at Creative Cuts and More to get a jump start on your holiday crafting!


Thursday, August 9, 2012

I have a fun Pop up Card to share with you today!

I started with a die cut Standing Pop Up card from Creative Cuts and More.

The image and sentiment are Stampendous Impressions Stamps.

I used a little silver detail embossing powder on the trim to add a little sparkle.
Before assembling the card I ran the base through my cuttlebug in an embossing folder to add a little more interest.  Then I assembled the whole thing using Killer White Tacky Tape.

This is what it looks like when it's folded up and ready to go into an envelope.

Stamps: 
Forest Santa from Stampendous 
Tis the Season from Stampendous 
Paper:
 Standing Pop Up card from Creative Cuts and More
Ink:
Memento Tuxedo Black dye ink
Spectrum Noir Markers 
Other: 
Silver Embossing Powder
Cuttlebug embossing folder 

I hope you enjoyed my project today!

Kristine 


Tuesday, July 3, 2012

NOEL Coaster Wall Decor

Next in the Line up is a NOEL Christmas Wall Decor piece...


This fun project took very little time to assemble and looks amazing hanging on the wall.

Here is a close up of the individual letters:
Dies used:
3 inch Alphabet, Candy Cane, Holly, Flower #06 small,

Assorted other items: SU designer paper, Embossing folders, Shimmer paint, Gems, Ribbon, corner rounder

Fun project for kids and adults easy and quick but looks like you spent hours.
Enjoy!


Sunday, December 25, 2011

Merry Christmoose

Christmas is finally here so I thought I would share one last Christmas project with you!


All week long I have kept running back in my craft room for some last minute stamping!

This time it was to make this card for my husband to give to someone at work.  He wanted a fun way to give a gift card and I knew that I had a few of these great
Gift Card Holder Square Scallop Card from Creative Cuts and More in my stash.


I decorated the front with this cute Holly Moose by Eureka Stamps.
And then I finished the inside with this cute saying.

This die cut card comes with the slot all ready cut out for the gift card!!!


I recommend that you always keep these Gift Card Holder Square Scallop Cards around in different colors so that you always have one on hand when needed for that last minute gift card giving occasion!

Stamps:
Holly Moose by Eureka Stamps
Merry Christmoose by Eureka Stamps
Paper:
Gift Card Holder Square Scallop Card from Creative Cuts and More 
Patterned Paper is from my stash
Neenah white card stock
Ink:
Memento Tuxedo Black dye ink
Copic Markers
Other:
glitter stickers (unknown source)
Felt rick rack
Spellbinders Dies
EK Success punch

Thanks for stopping by!

Merry Christmas!

Kristine

Saturday, November 19, 2011

Oh Christmas Tree

I am so excited to share with you a project I made for  Creative Cuts and More- I shared it with Laura at Paper and Pixels Magazine. Let me tell you I was blown over when she asked if she could share it in the magazine.  Each magazine goes out on the 15th of the month. 


Advent Calendar Tree Set from Creative Cuts and More


Basic Tree Directions:

1.       Fold (crease) each Tree on its fold lines. This will help your project go much smoother.

Note: At this point I decided to emboss my tree. If you choose to do this each tree will have an embossed side and de-bossed side.


2.       Place a strip of your Killer Red Tacky Tape on the top to connect the two pieces. If you wanted to stamp a design or insert pictures it should be done now.

      Note: I chose to use miniatures in each of the windows so I didn’t add anything at this point.
                
  1. You want to make sure all pieces line up and stay together. Using an aggressive two sided tape like Killer Red Tacky Tape - 1/8"  really makes sure it stays. Be careful not to glue the windows down. Once you have the tape down you can use your finger or the bone folder to burnish down the tape.
  
  1. Work carefully and make sure all the backing pieces are attached to the tree fronts.
  2. Next you will need to add tape to the back of the insert sheets; you don’t have to worry about the windows being covered on the backing pieces.
                  
  1. Work carefully and remove strip from tape from only one side at a time.
                            
  1. You will be joining half of one side of the tree (Backing side) to the next one half of the next tree. Continue to do this with all four tree pieces.
 
  1. There is also a present designed tree stand in the kit to use for the base.
     Note: I used miniature buttons, iron on patches, mini ornaments to adorn my windows.