Showing posts with label Weddings. Show all posts

Thursday, November 29, 2012

Purr-fect Couple Square Scallop Card


I have another Square Scallop edge Die Cut Card to share with you today.
I just love these things.  
They come with the scallops all ready cut out so it makes it easy to put together a quick and easy card!

I used a new S.W.A.L.K image from Crafter's Companion for today's card.


I started with a Square Scallop edge Die Cut Card  cut from Kraft Cardstock.  I adhered a strip of patterned paper at the bottom of the card and added some plastic drops to each of the scallops.


Then I just added layers of paper and the colored image and the card was complete!


Thanks for stopping by today!

Kristine

Saturday, August 20, 2011

Wedding in Red

Well I am sharing a tutorial today- I have made a decorated cake as a gift for my future daughter-in-law.
I started with a great Cake Slice Box Set-Two Tier. and Dress & Tuxedo Box Set.

Now I know I could have cut or made my own patterns- BUT please!!!

There is nothing better then having each piece perfectly cut and scored. No guess work was needed to make sure it all was the same.
Terry has great quality papers and I can customize colors and textures.
When I told Terry I wanted to make a gift for my DIL she mentioned this great idea- and told me to choose my colors. Do you know you have two color choices you can make out of dozens of colors and paper textures to make this cake design?
I really thought about making it with the brides color choices- red and white base- but went with Lily White for all the pieces.
I am going to share a few steps along the way making this beauty
I found a cake platter and doily to use along with the package I received from Creative Cuts and More.

This is what the cake slices look like flat-I also showed how I refolded all the score lines before I started assembling. I did use some Killer White Tear-able Tacky Tape - 1/4" to all the flaps.

*** since this finished cake had to be wrapped and sent 1600 miles and I wanted to make sure it held together through everything***


Here is a couple views of the cake slices assembled

Tissue paper was used inside each cake slice to help hold the shape- again this isn't necessary but I knew I was adding a lot on the top in weight and then sending in the mail.
Here I wanted to show you how I once again pre-folded the score lines before assembling.

Assembling the tuxedo went together very quickly- just a little tape to hold the shirt in place.
I folded the lapels and taped them down to hold in place.

Now the brides dress was customized by me to match my future DIL's dress- used some white tissue paper and white tulle to make.
Here is a finished view of the extra ones that were added to the package (I did make two sets ).
On this brides dress you can see the folds and pearls.
I added a flower and leaves for the grooms corsage.


I have included a few extra views of this finished project.Ribbon, pearl bead trims, tulle, and small red paper flowers are from Hobby Lobby I also purchased the Prima flowers from Hobby Lobby.


So glad you have popped in to visit today, I so enjoyed sharing this special gift with all of you.

Thursday, August 18, 2011

Vintage Wedding Mini Album ~ Lots of Pics!!

Hi everyone!! Fern here and I want to share with you this Vintage Wedding Mini Album that I made using Creative Cuts & More 6" x 6" Chipboard Album Covers. Added some Tags and Pockets, but will get to those a little later, and bound it together with album rings. Oh, and don't forget some Killer Red Tacky Tape , or if you prefer the Killer White Tear-able Tacky Tape.. It's a must have to put these together...
Okay, I have a lot to show you, so sit back and get ready to be inspired!!! :o)

Here is my front cover... The paper I used is Ella Blue g . c . d . studios and it's an 8" by 8" (48 sheet) paper stack.. I love the colors of this and it's perfect for my wedding photos... Oh, I forgot to tell you, this is "MY" wedding album... Yep, the photos are of me and my husband back in 1977.. so don't laugh!!!
I've made 3 or 4 of these albums and given them away, I wanted to make one for me and I wanted it to be special and something I can hand down after we are gone..


Here we have (2) Tag #04 in Chocolately Chip - SU Smooth. I embossed these with my cuttlebug. You can also order these with a layer of a different color...


Here I used (3) Tag Card (in Espresso Brown - SU Smooth) with Two Tags (in Blueberry Pie - Bazzill Smoothies) I embossed the top layer with my cuttlebug embossing folder and attached all three together.. The back of the first one to the front of another one.. the back of the second one with the front of the third one... Before I attached them together I added lace between the layers.. and then just attached the last one to my album... Added the layers and then my photos..
Notice the pearl knob on top.. this unscrews and lets the pages drop down... see next photos...


Knob unscrewed..


This is the first Tag Card with layers...


Second Tag Card with Layers


And this is the third or last Tag Card with Layers...


This is a 6" x 6" acetate page. I covered it with a Hambly Screen Print and then I attached the Slash Pocket with Tag #05 Pocket is in Chocolately Chip -SU Smooth and the tag is in Powder Blue - Bazzill Canvas. I also embossed the front of this with my cuttlebug embossing folder...


Here is the tag pulled out... I did a lot of distressing on this album and tags with Tim Holtz Distressing Inks..


The back side of the tag..


The back side of the acetate page is identical as the front.. The Slash Pocket with Tag #05 Pocket is in Chocolately Chip -SU Smooth and the tag is in Powder Blue - Bazzill Canvas. I also embossed the front of this with my cuttlebug embossing folder...


Tag pulled out...


Back side of the tag...


Miscellaneous bling and embellies...


Here is a chipboard pull out...


Back side of chipboard...


Here I made a small flip up held down with the paper clip fastened on top...


Here is the back side of the flip up page... Me and My Dad!!!


Page under the flip up page... This is also a pocket page... If you look closely under the paper clip you can see a tag... I have not journaled on this yet, but I will put some personal family history on it so when this little mini passes down through the years, it won't be a mystery!!! Something I wished my Grandmother would have done for me....


Used a lot of lace on this page, some flowers and bling... Also if you untie the bow you can lift this up and see more photos...


Just so you know.. the reason I am looking at my dear sweet husband like I am, is because I gave him strict orders he better not smash the cake in my face.... And as you can see he didn't!!!! :o)


More embellies and bling...


And here is the last page... Added some flowers, doily, feather, and bling!

Now here on the back, I am going to sign it and date it in my own handwriting, even though I don't like my handwriting. Years from now I think it will mean a lot if I do that....

Well, that's all I got for you today!!!
I hope I've inspired you just a little to go check out the goodies over at Creative Cuts & More!! If you do want to make a mini album, I found it easier for me to find the papers I want to use first. When you've done that just sit down with your paper and shop away... And don't forget to get some Killer Red Tacky Tape or Killer White Tear-able Tacky Tape and some Album Rings!!!
Be sure and check back tomorrow to see more inspiration from the Die Cut Divas!!
Have a wonderful day!!!
Hugs!!!
Fern

Friday, April 15, 2011

Is This Spectacular or What? (heavy in pics)

Wedding season is a time when love is in the air- May I share some inspiration with you?
Hi Everyone, Dawn ll here today.
I have to say I think this turned out so Well -hope you like.
Creative Cuts and More has the most spectacular die cuts and the Cake Slice Box Set- Two Tier is one of my favorite to use.
I love the dies from Terry because they are perfectly cut and always the highest quality. I get to choose from hundreds of paper colors and weights or materials.
I see patterns on-line that can be cut out by myself but so not worth a poor quality product for something I want to last and look spectacular.


This Cake Slice Box Set- Two Tier cake (die cuts)was actually made for Terry in opalescent white metallic and I used Amethyst accessories.

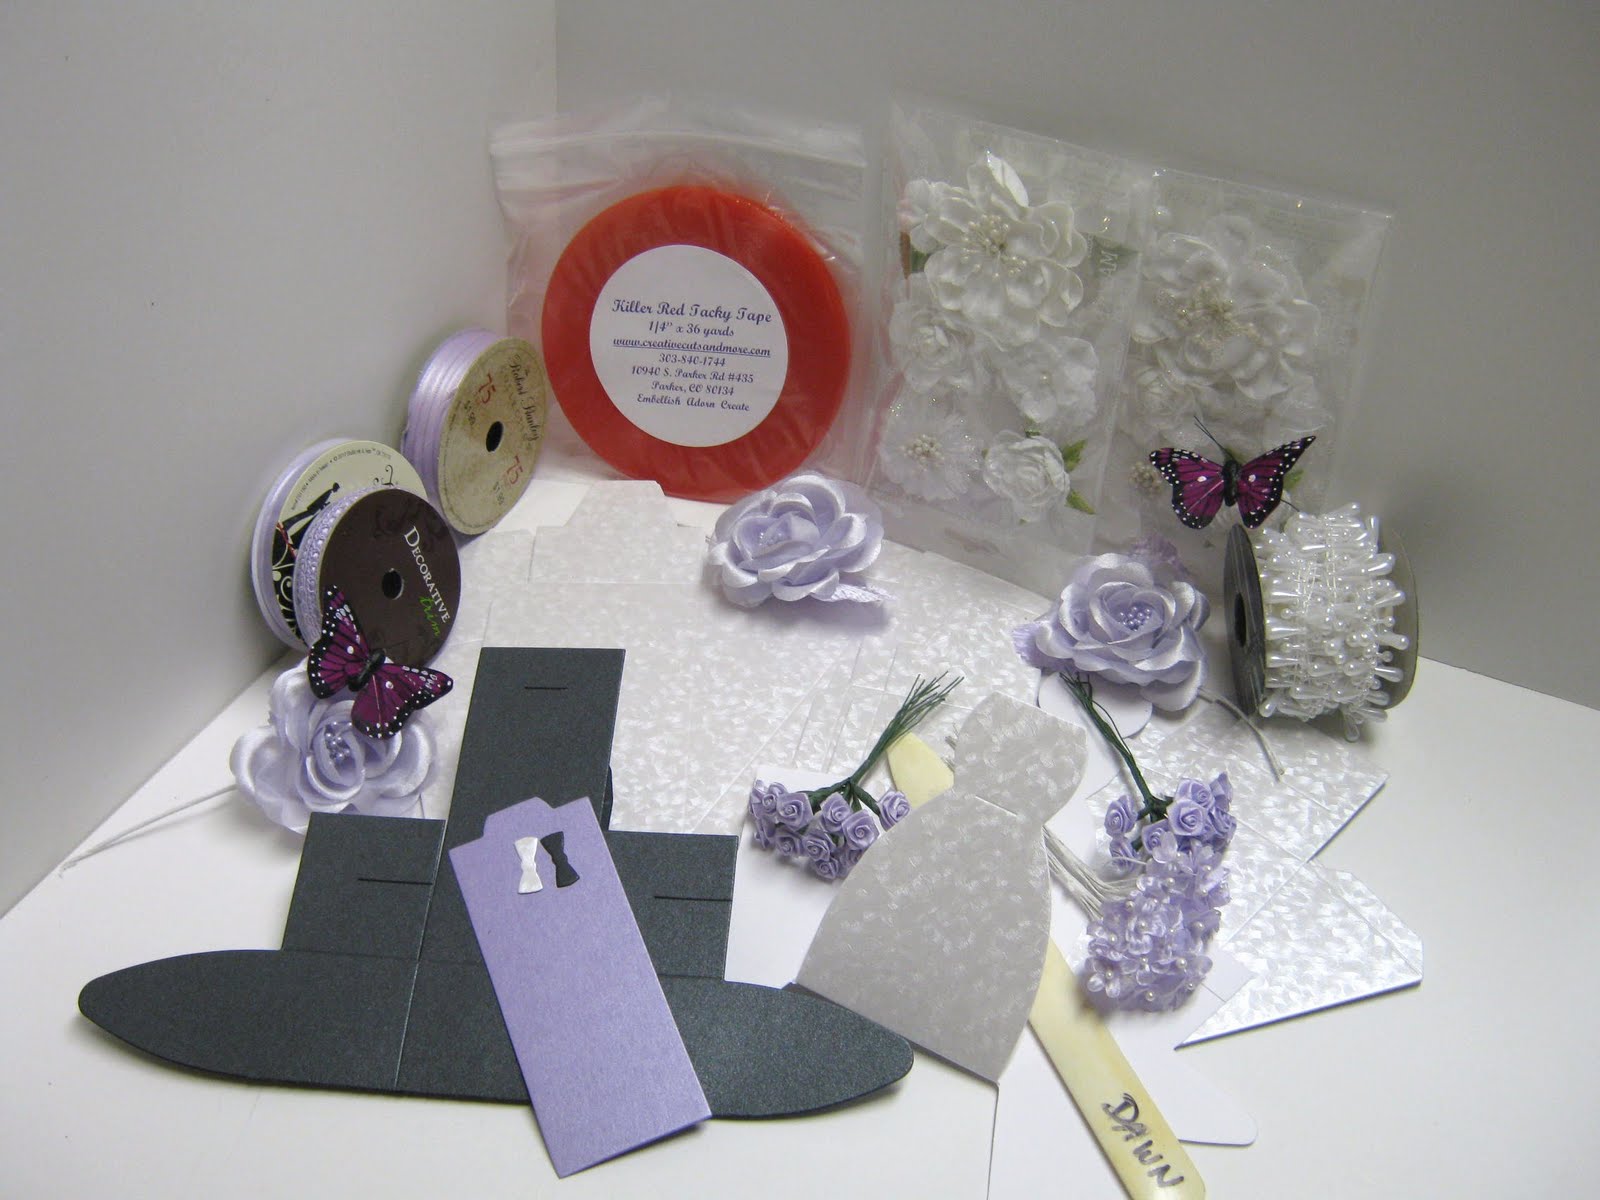
Here is the basic supplies I started with to create this wonderful cake.

Let me share some steps to construct one of your own
You may also contact Terry at Creative Cuts and More to purchase the supplies and have me construct and decorate for you in your choice of colors.

I chose to use a cardboard cake form as a base. Killer red Tacky tape works best for this cake because I used metallic papers and I wanted it to stay together.I personally like to use a bone folder to make all the folds crisp, but it isn't necessary if you choose not to use one
White tissue paper works well to stuff the inside to help keep the form of each slice and not add weight to the cake.


Wanted to share a close up of the tape areas to help keep the slices together forever.


The larger size slices get placed on the bottom first and placed closely together to give the top layer the support it will need after fully decorated.
This is a quick view of the two tiers together undecorated.
These are the supplies used to decorate and assemble the Dress and Tuxedo Box Set.


The Dress & Tuxedo set come as a separate set and the suit, dress, shirt and tie can be made in any color choice you would like.
Each of these pieces can also be purchased separately.

I used Tulle that was dotted to accent the dress- sort of a thin liner so the pearl shine on the dress shows through.

Decorating the Two Tier Cake is the best part of this process. I started with the teardrop pearl and braided trim around the middle of each layer.
The bride and groom were added to the middle of the top of the cake at a slight angle to make room for decorations.
I was lucky to find these beautiful open flowers in a Amethyst shade to match the grooms shirt and tie.
I even added a small flower to the lapel and around the waist of the bridal dress


I had to add a couple butterflies to this Spring like two tier cake.
Many of these items can be purchased individually if you would like to check them out.

Cake Slice Box - XL

Cake Slice Box - Large

Cake Slice Box Set-Two Tier

Please let me know what you think- I am always excited to hear if you like what I have shared or not.
Please pop over and visit Creative Cuts and More and let Terry know I sent you.

If you use my code CC&M11DawnLoth you will get a 10% discount.