Thursday, November 4, 2010

A Litttle Christmas Reprise...

Hi everyone! Becky here today.
I am repeating a post from our Christmas In July Blog Hop today because I have been laid up for over a week with a silly cold that is kicking my bum & I just haven't had the mindset to craft lately! I promise to have new something to share soon! But be sure to look around at previous posts & the July Hop for tons of ideas for your Holiday crafting!


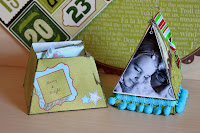
For this project, I decided to work with the Pyramid Box & the Pyramid Flat Top Box.  I knew that I could layer these two to make a fun Christmas Tree with a hidden treasure inside!


After monkeying around with the image of my daughter in PSE, I cut various papers from Making Memories "Fa La La" collection & some fantastic BoBunny paper called "St. Nick in Toyland,"  into the triangle shape for the top of the tree. I used the fabulous Killer Red Tacky Tape in 1/4" to put the pyramid all together. Once that was done, I inked the edges of all the paper triangles with TH Walnut Stain Distress Ink before adhering the paper to the pyramid. I just love that pic of my daughter hugging Santa!!! (For those that live in the Denver Metro area, The Barn at Castle Rock has the greatest Santa, you can take your own photos & NO lines!!! All for FREE!!)

For the bottom, Flat Top Pyramid Box, I first used Olive Vine & Sunflower Glimmer Mist (I think I might be becoming a GM addict!) to get the same tone of green in the paper's I was using. I rubbed on a little image from Webster's Pages "Ting-a-Ling" collection on the front, a little "25" cut out from a piece of the MM "Fa La La" papers & glued it all together (including the lid to the top Pyramid) with more of the Killer Red Tacky Tape! Next, I used more of the Killer Tape to run that FABULOUS fiber across the top (also from Webster's)


Even though I wired the top & used a little ribbon from my stash, because of the hidden treasure inside, the tree is really too heavy to hang.


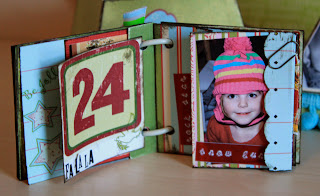
My little "treasure" inside, is just that...a little book of some favorite memories of Maggie during the 2009 holiday season! After printing a contact sheet (this is a great way to get tiny pix for these kinds of projects all at once!) in PSE of the photos I wanted to use, I cut all my papers from the Webster's Pages "Ting-a-Ling" & "Winter Wonderland" collections, as well as some more of that great BoBunny paper roughly into a 2x2 inch squares & whipped it out in no time!
Below are some more photos from the mini-album. I really tried to keep it simple, with the exception of a little accordion fold inside to allow for a few sequential photos. Like I mentioned above, I used mostly the Webster's papers, but threw in a few others from my stash. You'll see a couple of those great rub-ons again as well as tons of dymo labels! I LOVE my WRMK label maker with all the different font wheels (Dymo makes one now too)!!!


Be sure to check out Creative Cuts & More for all your Holiday projects!
!00's of new dies & more being added every day!
Thanks for looking!
See you soon!
Designer: Becky Voth

Wednesday, November 3, 2010

Cowboy Christmas


Hi, Lisa here today! In case you missed last months Blog Hop, I'm sharing one of my projects I created, it features the Bell Box with Layers in Copper Prism Metallic.  I embossed the die cut with the Cuttlebug Stars Folder, the images are from Kitchen Sink Stamps.  Now I have a wonderful ornament all ready for the holidays!

Don't forget Creative Cuts and More now carries Killer White Tear-able Tacky Tape, this tape makes assembling your projects a breeze, no more stopping to snip your tape with scissors!


Tuesday, November 2, 2010

A LOOK THROUGH MY WINDOW...

Hello Everyone - Chris Dickinson here.

I used Creative Cuts and More - Four Pane Window Card - A2 and the pumpkin die cutI just LOVE these die cuts!!! They make such wonderful, fast projects that look FABULOUS!

I used the yummy, Shimmery Creative Inspiration Paints to paint the image! The stamp image I used is from I Brake For Stamps .


Thank you for stopping by! Have a wonderful day!!!
Chrissy D

Sunday, October 31, 2010

Happy Halloween!!

Happy Halloween, everyone! It's Darsie here, and I just love, love, love Halloween! There are so many fun ways to create with diecuts, and today I chose to make spooky candy boxes using the Coffin box diecut!


For this coffin candy box, I cut an oval out of the coffin lid, then embossed it with an embossing folder from Quickutz. I swiped Brilliance White ink over the entire coffin lid and base to give it that "aged stone" look. I accented the coffin with some sparkly red and black tulle, and an adorable Dracula image by Repeat Impressions which I glued to lollipops! I added a few rhinestone bats, and I was finished!


My next candy box was more on the simple side! I added the Small Spider diecut, which I had embossed with a Swiss Dots Folder. I also embossed the lid, same as above, and aged it with the Brilliance White ink. My spider web is from a Martha Stewart punch. I added a few rhinestones for eyes on the spider, a sticker for the sentiment, a big fluffy tulle bow and I was done!


Saturday, October 30, 2010

Appetizers & Drinks!

Hello everyone!  It's Noelle posting today!  It's finally fall in the Denver area!  Beautiful leaves every where and the kids are going to get to go Trick-Or-Treat without the snow falling!
Have you tried this Apron Pocket A7 Card yet?  It is one of my FAVORITES!  It's not just a card!  You can make it into an album of your choice or try our Holiday Treats Apron Recipe Kit!  I am making another mini album using the Unity Homemade By stamps.  The ribbon is from my stash.  I am pretty sure the polka dot is from Creative Impressions and the lace is from JoAnn's.  It was super easy to attach using the Killer White Tear-able Tacky Tape!   Honestly, the whole thing took me less than 30 minutes!  You can't really tell but on the stamp I used a gelly roll pen and some glossy accents!  Super fun and easy, that's how I like it!  Thanks for stopping by today! 

Friday, October 29, 2010

Jungle Fever!


Good Morning!  After making several girly pink baby ensembles, I had to do a set for the boys.  This set would be perfect for a baby shower or gift ensemble for a new mom.  I couldn't resist this Jungle themed paper by Reminisce "The Wild".  And I loved that the colors were non-traditional.

I love this A7 Scalloped Card!  I used a Clear and Simple stamp set on all of these projects.


That's it for today.  Stay tuned to the Die Cut Diva Blog for great CCM project idea's!

Tuesday, October 26, 2010

Boo Bites!

Hi everyone!
Kim here again today to share a super simple Halloween Candy Bar Cover! A couple of years ago, someone gave me a "custom" wrapped candy bar & of course I thought to myself, "I can do that!" And so can you!!!

I simply covered the bar with some fun, spooky paper; added a Halloween border sticker along the bottom. Then I embossed the spider web onto the Petite Vintage Label, added the witch sticker a little saying! A perfect little treat for a teacher or a special neighborhood ghoul!!
Thanks for looking today!
Don't forget to check out the Creative Cuts & More website for 100's of dies for all your holiday projects!!
Designer: Kim Langhorst

Monday, October 25, 2010

Fall Inspiration ...

I love fall. The colors, the cooler temps, Thanksgiving, ahhhh. So this week I'm going to share a couple of quick and easy Fall cards today. Both of these were created using A2 Circle Small Window Card. 


Both of these cards were so easy because I combined them with Jolee's sticker products. I just love this wreath and if fit the window perfectly.


And the little Autumn sign hanging in the window is just perfect for a window card. as well.

The window cards are so much fun to embellish.


I added a few other Creative Cuts and More dies to this one.


I hope you are enjoying fall as well!
See ya on Friday with another post!
Melisa

Sunday, October 24, 2010

A Sweet 16 Album Part 2

"We interrupt our regularly scheduled program... "
I know that on my to last post on the Die Cut Divas Blog I said that I would unveil the rest of this album on the 21st. But since we have a BLOG HOP on the 20th, Terry asked me to change my regularly scheduled post so that more people can enjoy our Thanksgiving & Christmas ideas next week!

So, here's the rest of my Sweet 16 Album. (I apologize in advance for the lighting in the photos. I did not realize how bad it was until after I had given the album to Terry!)


Here is the cover again. I used the Pennant Album in acetate. The great thing about ordering albums (or ANYTHING) Creative Cuts & More is that you can order in any color, material & number of pages you want!! For this, I ordered 6 clear pages to play with. Then I ordered tons of Birthday-related dies in the kraft color because I knew that I could always alter them with inks & Glimmer Mists!
(There are a ton of photos because I wanted to show you how you can see the layers through to each page...)
Pg2

Pg 2 Closeup

Pg3

Pg3 Closeup

Pg4
Can you see the shape it's taking when fully opened??
Pg4

Pg5
Ta Da! Instead of a traditional binding at the side, I punched my hole along the tips of the banner & used a binding post to attach them (this album come without any holes punched so that you can put them where you want them). It opens really easily into this flower. I tried not to make the pages too bulky so that it would open nicely!
Below, is just another look at each page individually & a listing of supplies I used...
Cover: Cupcake & Balloon
I cut apart 2 identical cupcakes for the above effect. I embossed & inked the lower part of the cupcake & Glimmer Misted the top portion to look like chocolate. Next I glimmered the balloon & used stickles to write the 16 & highlight the cupcake.
You can see this cute Shopping Bag (coming soon) through the front. 
I LOVE this little bag! I placed a couple of pieces of paper inside to resemble tissue, added a shipping tag to pull out for journaling & TINY jewelry tag that says "for you."
More balloons with Glimmer Mist

Party Hats & Gifts coming soon!
I used stickles to fill in the polka dots on the hats,
covered the presents with paper & stickled the bows.
Cake slice coming soon!
I covered the cake slice die with a couple different layers -
the one in the middle has strawberry paper surrounded by the other "chocolate" layers! YUM!
Thanks for looking & see you on the 20th for the

Designer: Becky Voth